<onWebFocus />
Knowledge is only real when shared.
Creating Your Own Custom Font
September 3, 2023
All about fonts in Web Development and crafting a custom font with Figma.
Traditionally, and even today, textual content constitutes the core of most websites. Unless explicitly specified otherwise, the default system font takes the responsibility of rendering this textual content. The impact of fonts on the overall visual appeal of a webpage is quite significant. Hence, the selection of fonts demands careful consideration. To maintain visual harmony, a general guideline suggests limiting the use of fonts to a maximum of two different ones throughout a page, with a consistent application across specific elements.
Choosing a font is largely a subjective decision, and the creation of one often involving a touch of artistic expression. A perusal of the diverse collection of Open Source fonts showcased on Open Foundry swiftly underscores our ability to effortlessly comprehend text, irrespective of the specific font employed. Nevertheless, it's prudent to opt for a more universally recognized font for substantial portions of text, while reserving a more eclectic option for headings or purely aesthetic segments of the page.
Font Types
Fonts can be categorized into three fundamental types: sans-serif, serif, and monospace. Sans-serif fonts possess a clean appearance, while serif fonts, like Times New Roman, exhibit an older "newspaper" style with small strokes at the edges. In scenarios involving programming code, monospace fonts are preferred, where each character occupies the same width. This uniformity facilitates the use of indentation as a syntactic element. Additionally, fonts offer diverse styles such as Regular, Bold, Light or Italic. Although modern browsers can simulate these styles using a single regular source font, the option to load a distinct font for each style also exists.
This is the Title
This is some text.
Helvetica, originating in Switzerland prior to the digital era, closely resembles Arial—popularized by Microsoft Word. Contemporary platforms each boast their own array of fonts integrated into their native UI. Windows 11 adopts Segoe UI Variable, while Android adheres to the Roboto fonts, aligning with the Material UI philosophy. Apple, historically valuing fonts, notably saw Steve Jobs' engagement with a calligraphy course in college. This influence is evident in their use of the San Francisco font and a serif-style font named New York.
When integrating system fonts into development and design, it's imperative to recognize their potential unavailability on alternate platforms. Consequently, preparing a fallback font or considering font downloads becomes essential. Notably, all the aforementioned system fonts are accessible for free and can be utilized across different platforms.
The aforementioned approach suggests a default font configuration that ensures appealing typography across all platforms. Further details can be explored in the System Font Stack resource.
Loading External Fonts
Web browsers offer support for a range of font formats. Among these, the most advanced format is WOFF2, which has achieved universal support across major browsers. WOFF2 is quite efficient, resulting in significantly reduced font sizes. When creating fonts, the output typically comes in formats like .ttf (TrueType) or .otf (OpenType), both of which are now widely compatible. Consequently, there's generally no need for a conversion to WOFF2. It's important to note that WOFF format also encapsulates fonts in the TrueType or OpenType format, albeit with vastly superior compression. Because the underlying formats are the same, conversion to WOFF is usually no problem.
This is a Custom Font
The provided code snippet outlines the procedure for loading a font from CSS using the @font-face rule. Within the block, the font can be assigned any desired name using the font-family property. However, incorporating custom fonts mandates the parsing of associated CSS, a prerequisite for font loading. This sequence of events often causes the page to render in the browser prior to the font's complete loading and insertion, consequently resulting in what is commonly known as a "Flash of Unstyled Text". Typically, this occurrence can be mitigated by configuring appropriate fallback fonts. Upon the subsequent rendering of the same page, the cached font will already be available, thereby alleviating the issue. Notably, modern browsers refrain from displaying text until the custom font has fully loaded. Alternatively, a marginally improved approach involves initiating the font load via HTML using the <style> element, allowing the font to be loaded concurrently with the CSS.
Google Fonts presents an extensive array of free fonts available for embedding into any webpage, conveniently cached on their Content Delivery Network (CDN). For users of Next.js, the platform offers seamless integration with Google Fonts, further facilitated by the inclusion of the next/font package.
Parts of a Glyph
Distinct characters generally inhabit varying amounts of space, each demarcated by designated lines. Compact lowercase characters such as x are centered within a zone known as the x-height, spanning from the baseline to the top of the x-height. In contrast, capital letters typically extend higher, reaching into the cap area. Additionally, certain letters may extend below the baseline into the descender region or ascend above it into the ascender region.

OpenType.js.org serves as an intuitive visual tool designed to facilitate the direct inspection of any glyph from an uploaded font right within your web browser.
Creating a Font with Figma
This section explores the fascinating world of crafting custom fonts and provides valuable insights into creating and exporting your very own typefaces using Figma. The intricate process of font design involves meticulously shaping font glyphs, much like working with vector-based formats such as SVG. Figma shines as a powerful tool for manipulating vectors, granting users the creative freedom to craft unique fonts entirely from scratch. It's important to note that font creation is a specialized endeavor and may not be seamlessly supported by Figma or other conventional design tools.
Now, let's introduce you to the Figma Font Template (see also the improved template link below) — your key to crafting a diverse array of fonts with Figma's resources. This template features a dedicated script that works its magic, harmoniously transforming various character components into a cohesive font. However, it's essential to be aware of certain script limitations. For example, using masks to truncate shapes might not produce the desired glyph outcomes. In its initial iteration, the template includes both lowercase and uppercase letters, numerals, and even a space character, offering a solid foundation for your font design journey.
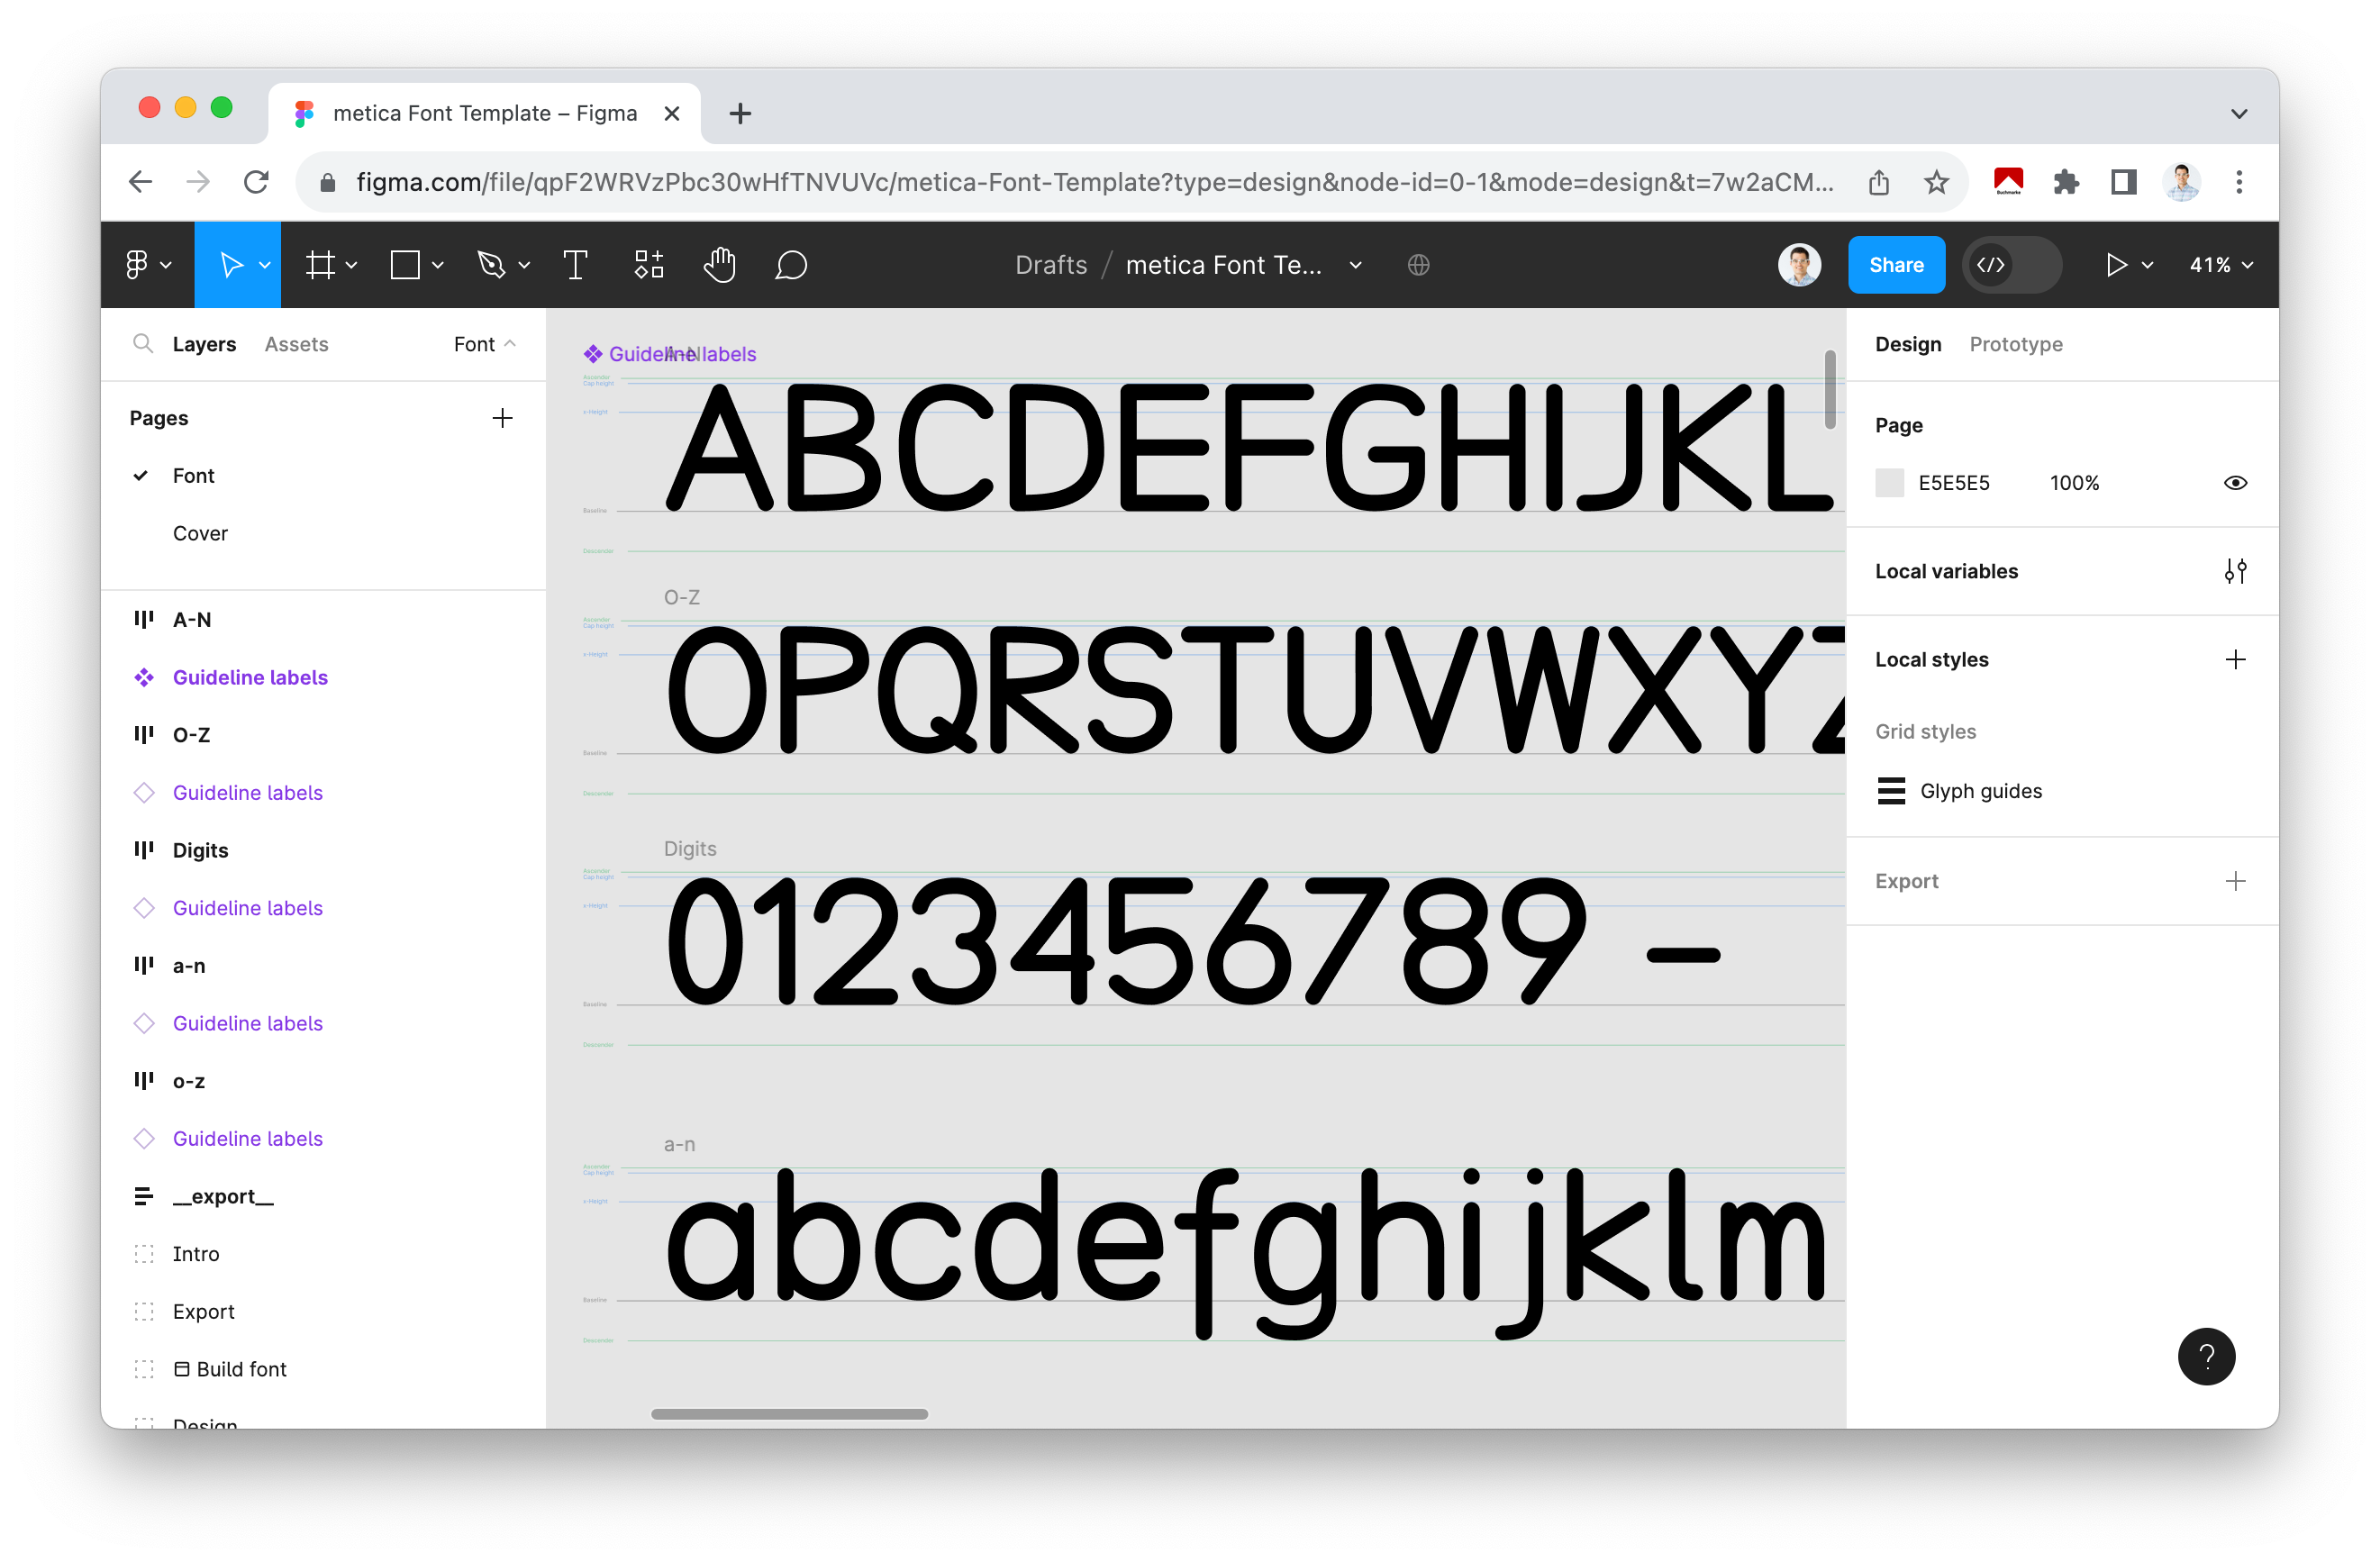

The initial template, crafted by Rasmus Andersson, the creator of Inter font, presented some challenges as the generated glyphs didn't align with the typical font format. To address these issues, I've undertaken a remix of the template within Figma, resulting in an enhanced version available for download: the metica Font Template. Unlike the original template, which confined glyphs to a relatively small space, this revamped version offers improved sizing and incorporates labels and guidelines for every character line. The glyphs themselves, represented as Figma components, are thoughtfully organized using an auto-layout system, simplifying the process of selecting appropriate widths for each glyph design.
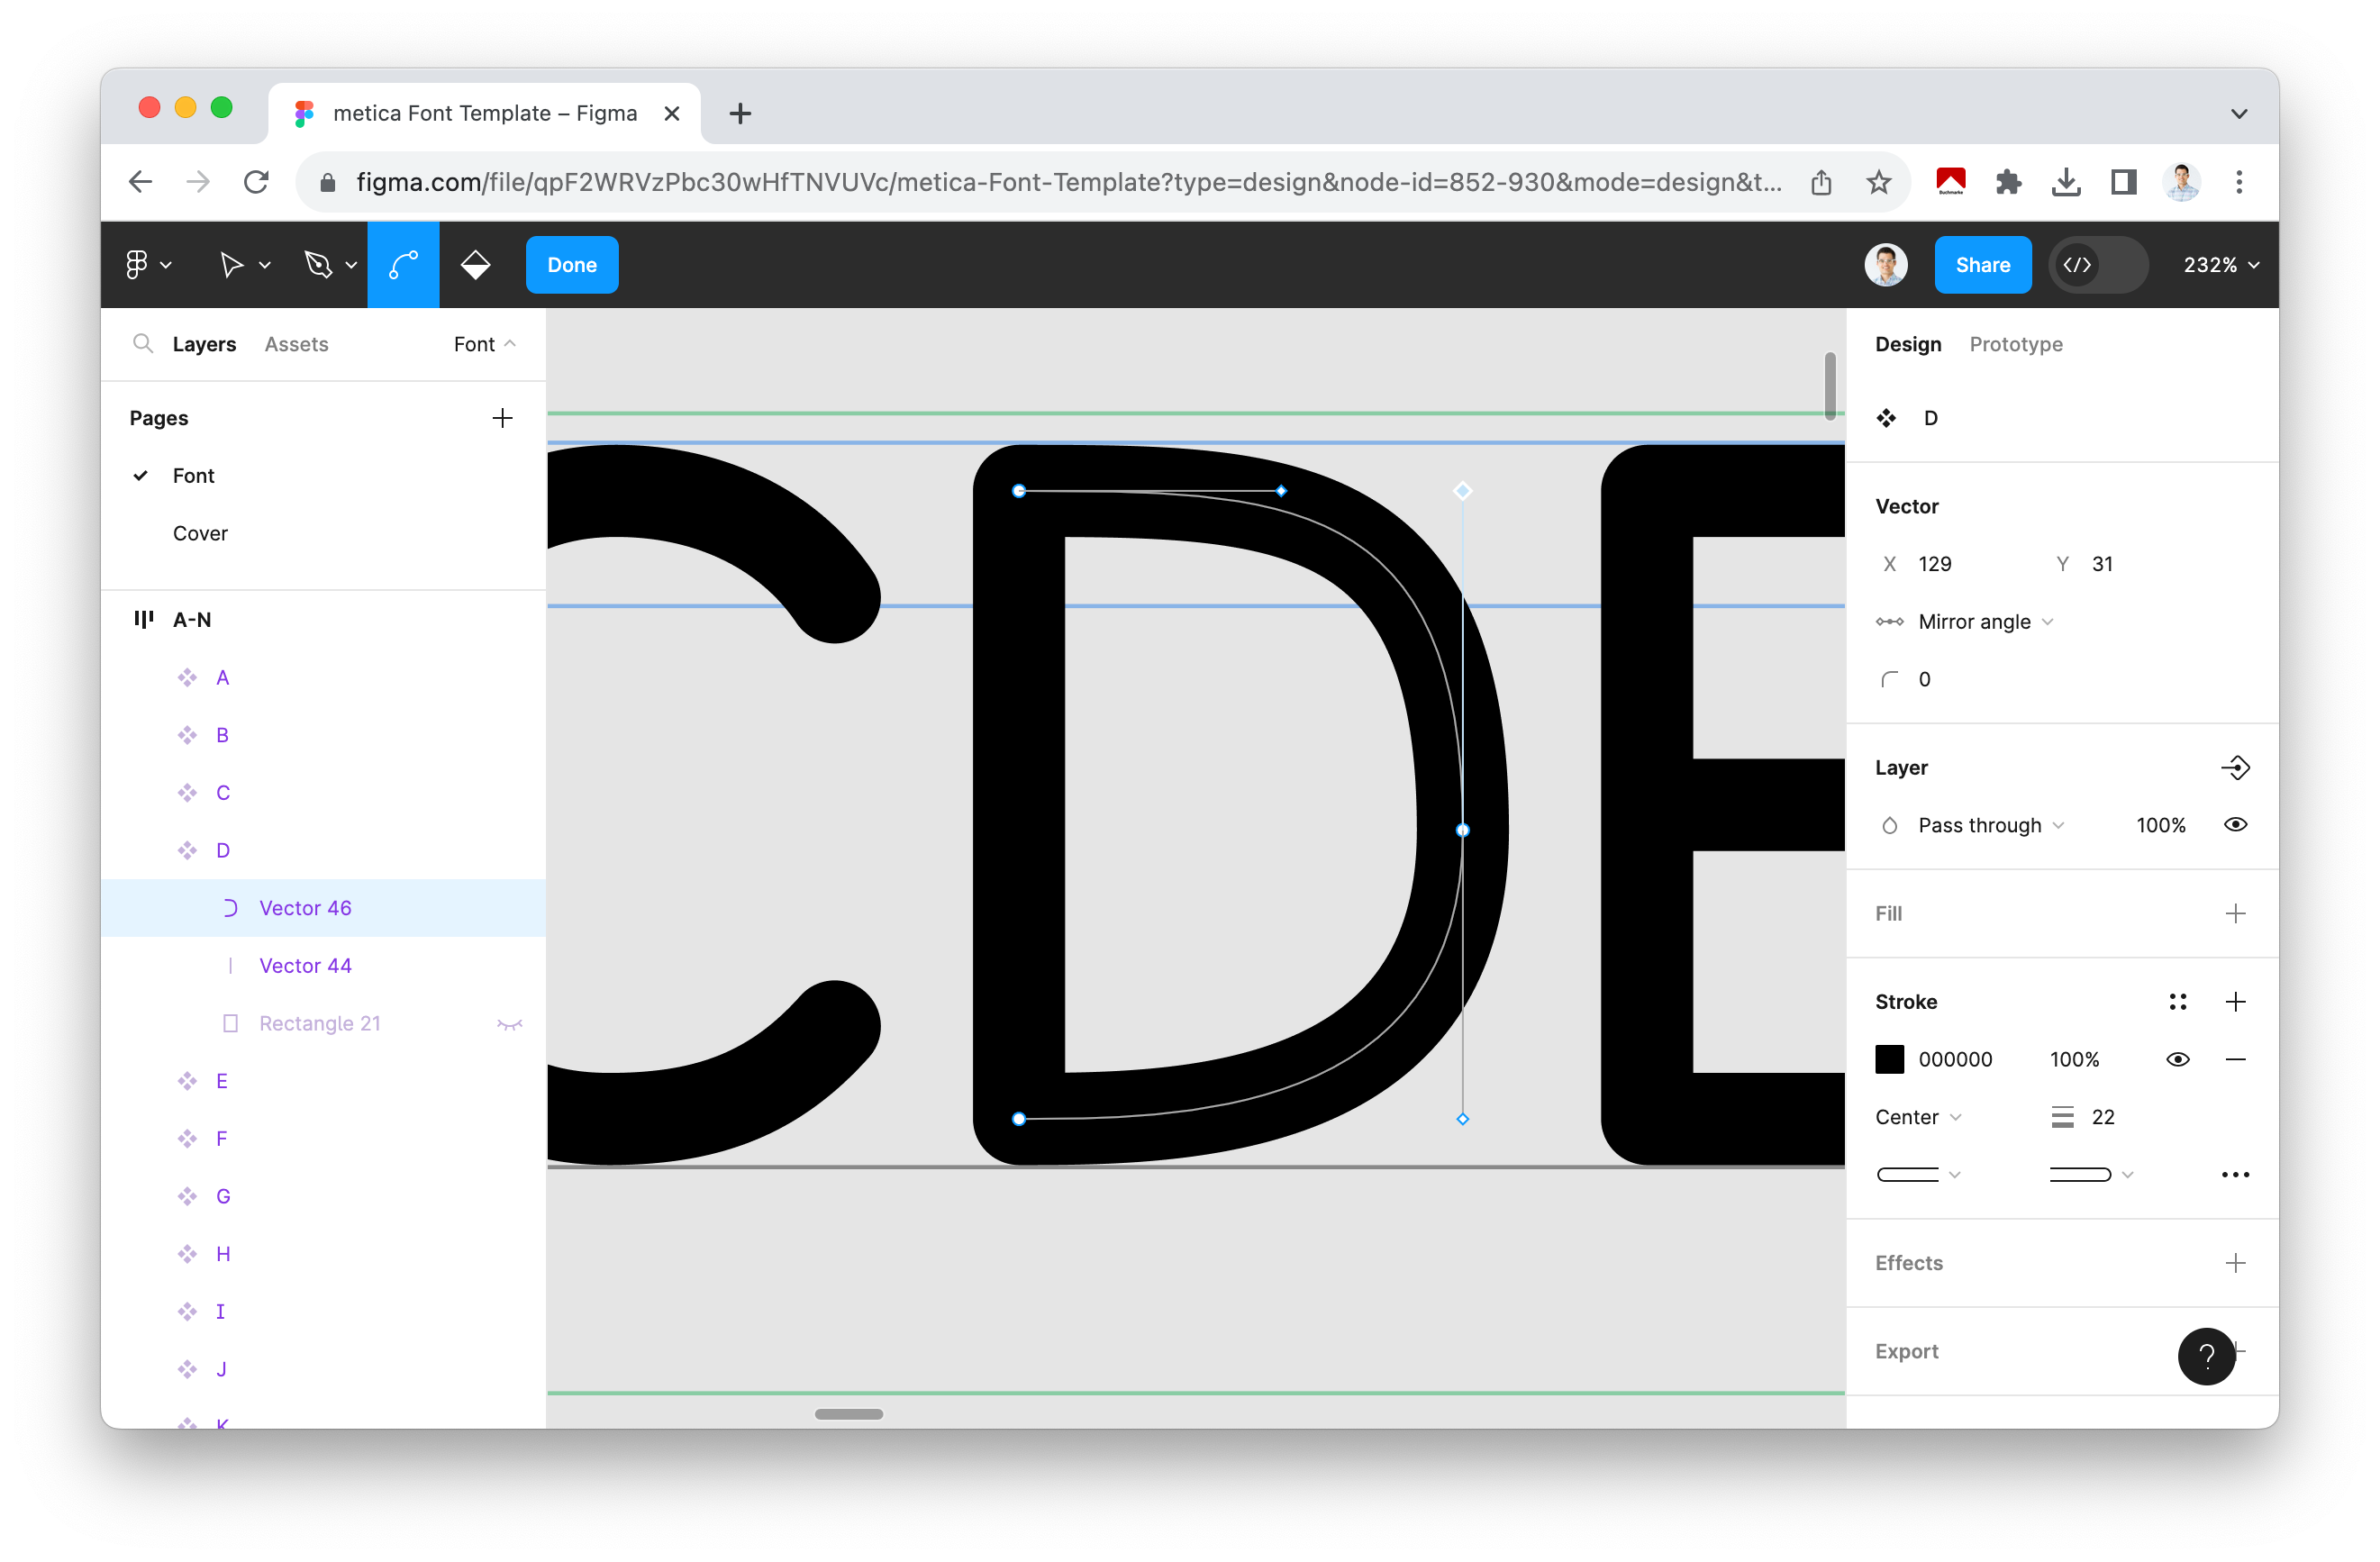
However, it's important to acknowledge certain limitations inherent to the font creation process in Figma. Firstly, Masks cannot be used to generate precise glyphs; instead, you should employ Boolean Operations, such as intersection, to manipulate shapes and paths effectively. Additionally, it's worth noting that fonts generated using this template may encounter compatibility issues with certain browser features like text-stroke, which may not function as expected.
Editing an Existing Character
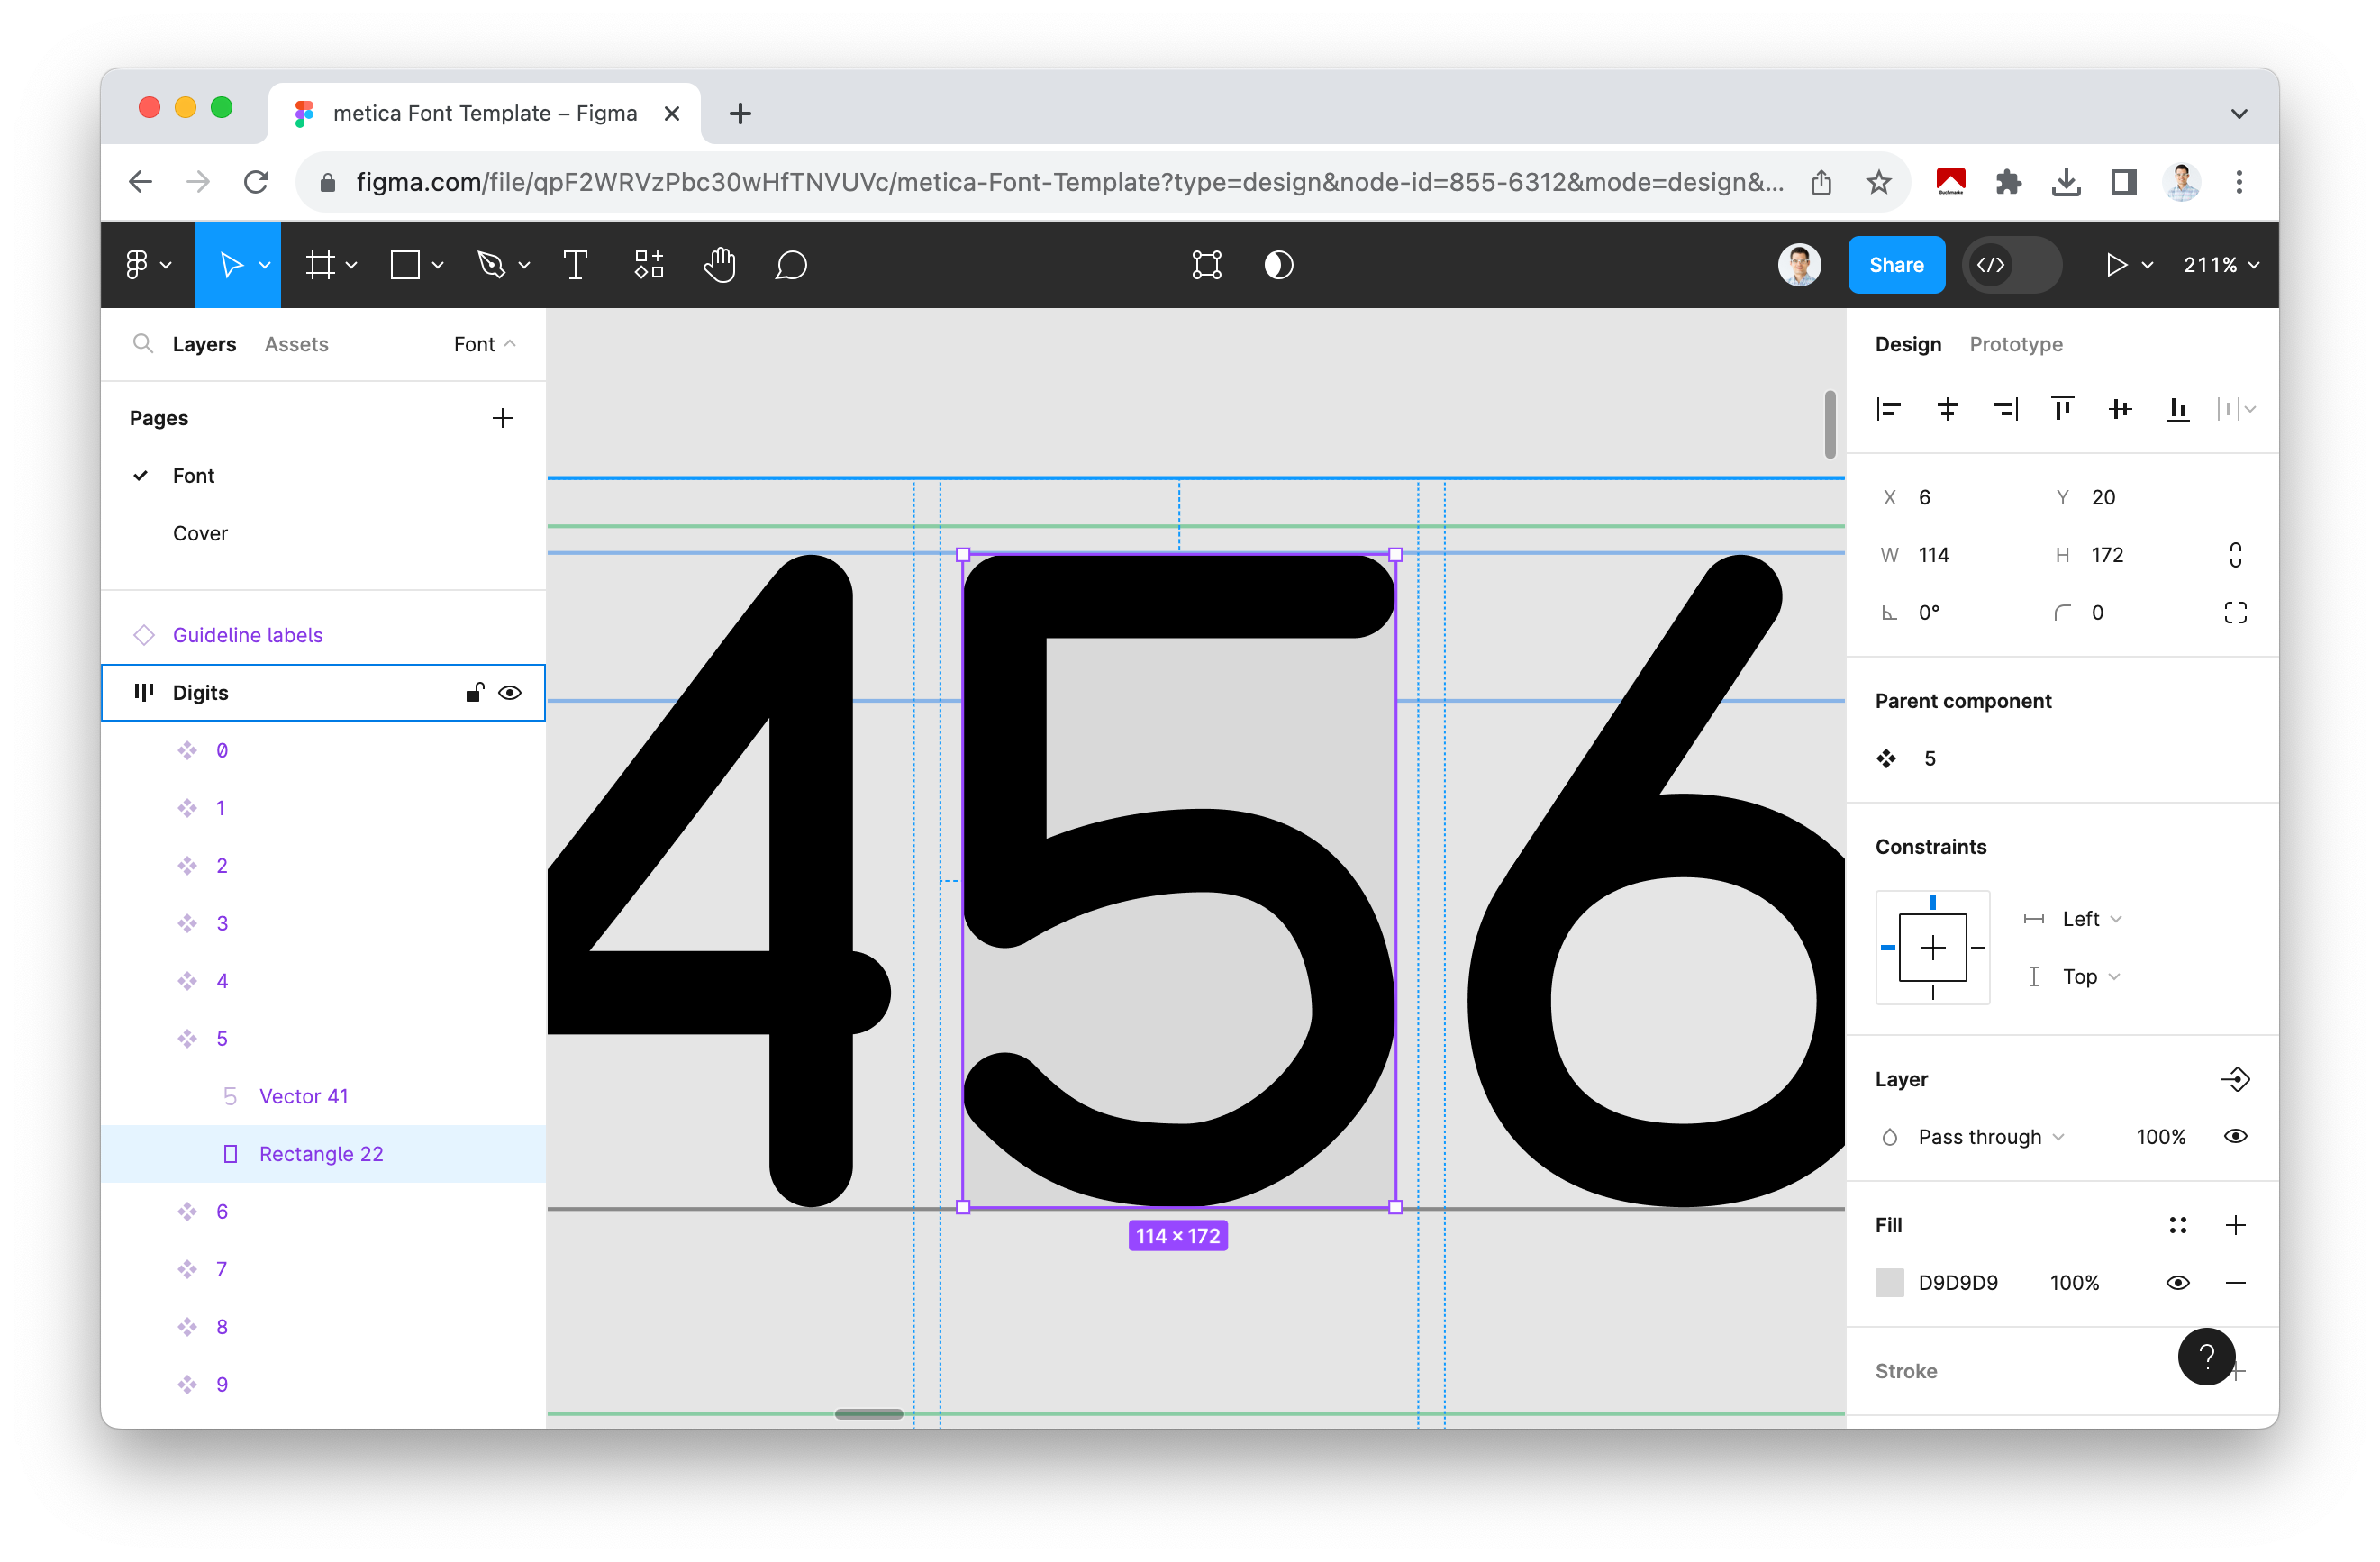
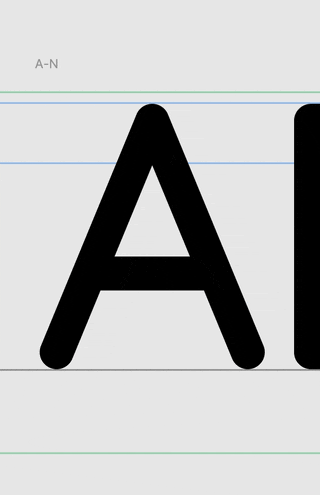
To modify an existing glyph, locate it in the central section of the template and proceed with your edits within the component. You have the flexibility to adjust the component's width to align with the character's design. Most characters measure 146 x 256 in size. While the height remains consistent across all glyphs, the width can vary significantly, accommodating both compact characters like i and broader ones like M. For precise vertical alignment, refer to various guidelines such as the baseline or ascender, which are visible. The horizontal space to the left or right of the character adapts to the glyph's density on each side. For instance, A requires minimal space on either side, whereas N demands ample space on both sides to yield optimal results. The template includes a concealed rectangle beneath each glyph, which can be revealed to highlight the designated area.
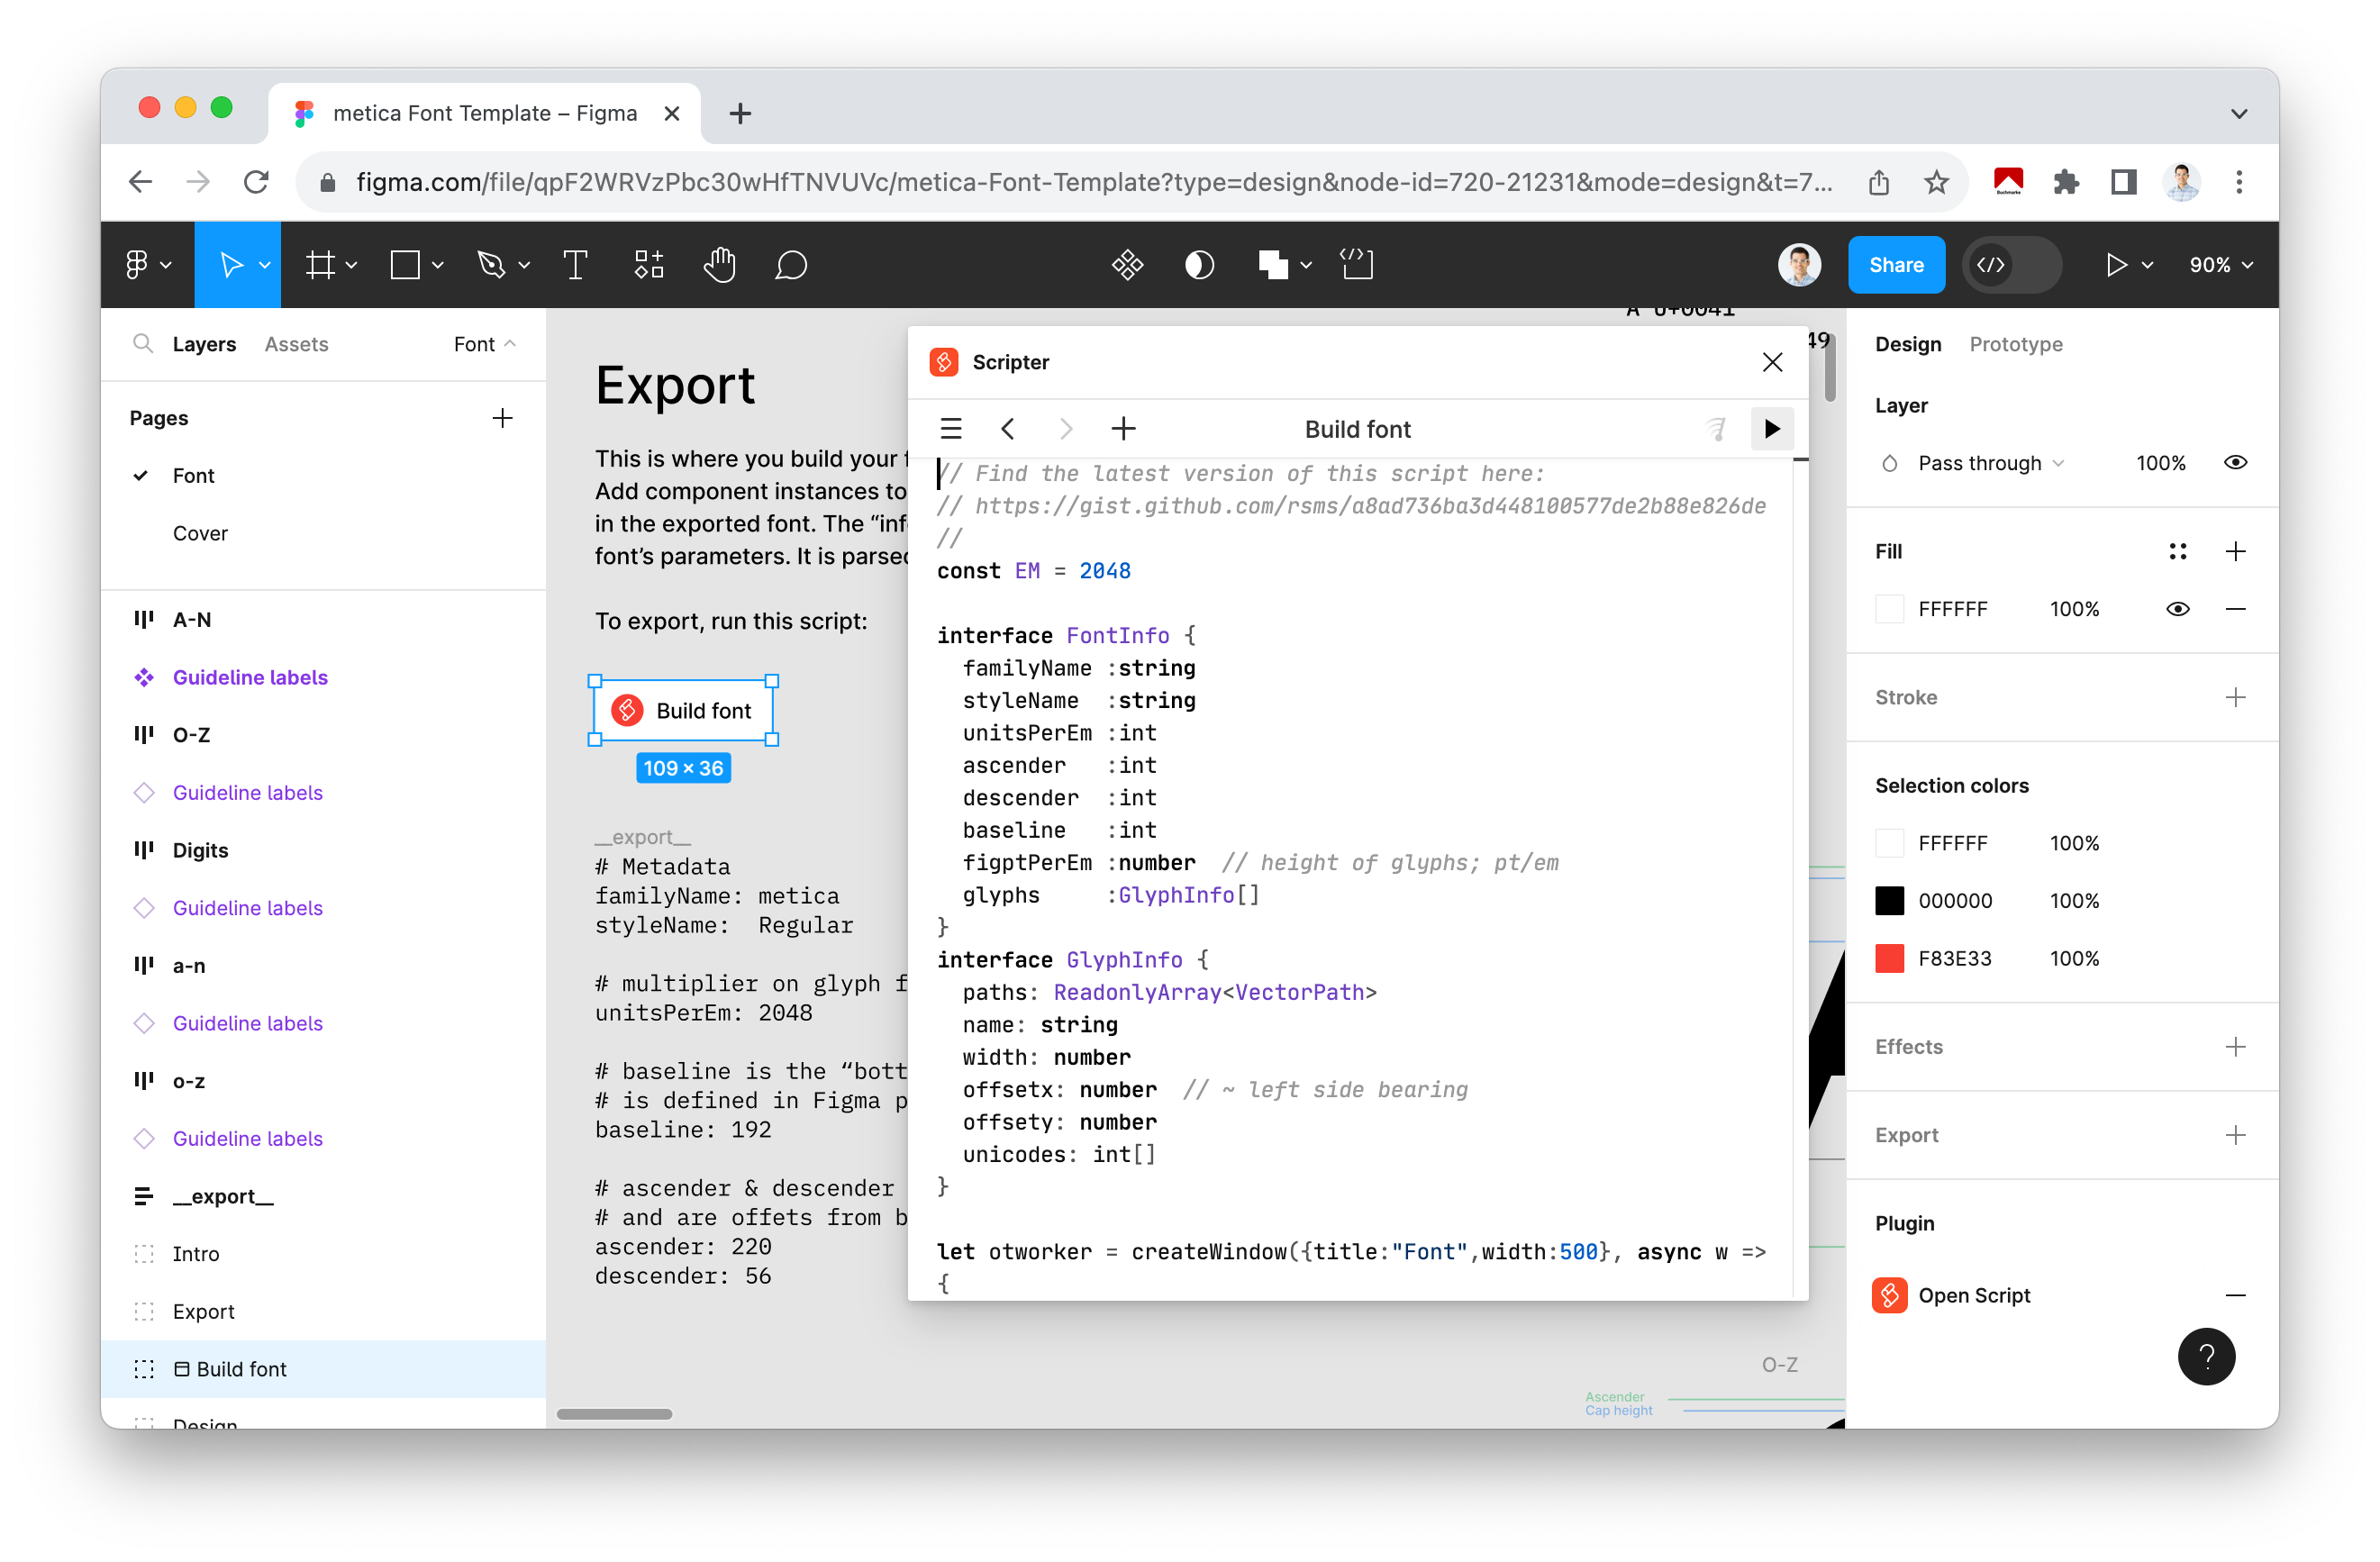
Glyphs inherently rely on vector-based elements, primarily paths and shapes. On the left side within the Export group, you can customize the parameters for generating the font. You can specify the font's name, style, and additional variables, such as the baseline's position, which the script will utilize during the font generation process.
Adding a New Character

It's possible to add any unicode character by creating a new component and assigning it the unicode code. A list of all available unicode characters can be found on Wikipedia. To add @ to the font the component should be named @ U+0040. To add the component to the font create a variant and move that into the __export__ group on the left where all the other characters are listed vertically.
It's possible to add any Unicode character to your font by creating a new component and assigning it the Unicode code. You can find a comprehensive list of available Unicode characters on Wikipedia. For example, to add the @ symbol to your font, name the component as @ U+0040. To incorporate the component into your font, create a variant and move it into the __export__ group on the left, where all the other characters are listed vertically.
Follow these steps to add an additional character:
Start by adding a new Frame.
Set the height to the Glyph Height variable of
256px.The width can be set to match the specific glyph -
128pxin the preview to the right.Outline the area where the glyph will be positioned using a helper rectangle; you can hide this rectangle later.
Use the pen tool to draw the desired path for the glyph, making sure each segment is precisely located.
Transform the Frame into a Component by selecting Create component.
Create an instance of the component by copying it with
⌘ + Cand then pasting it into the exiting__export__frame on the left.
Font Showcase
I've employed this method to craft three distinct fonts. The first is metica, a rounded sans-serif typeface that exudes a modern aesthetic. The second font, tobua, embraces a more creative direction, with a focus on minimizing paths for an elegant yet minimalistic design. Finally, there's monua, an edgy monospace font that brings a unique character to your text. Notably, Monua goes beyond the standard character set and incorporates essential special characters often required for JavaScript coding.
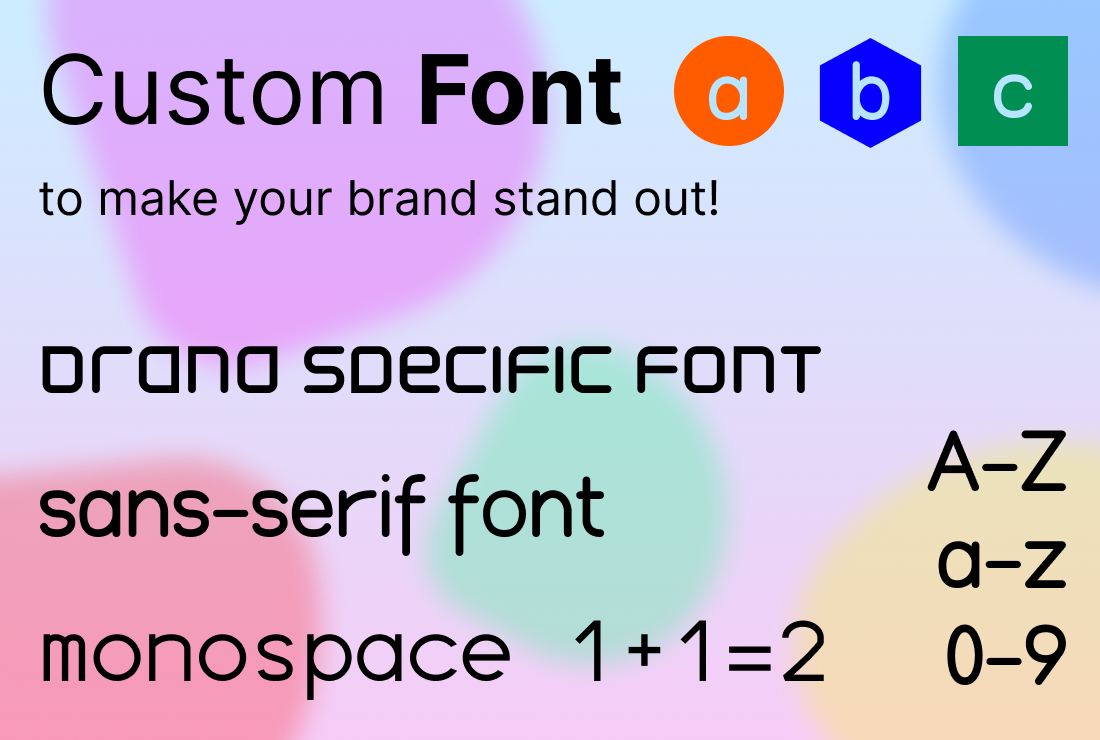
Sans-serif Font
a b c d e f g h i j k l m n o p q r s t u v w x y z A B C D E F G H I J K L M N O P Q R S T U V W X Y Z 0 1 2 3 4 5 6 7 8 9
// Programming Font
const who = 'world'
const count: number = 1
const values = [1, 2, 3]
const template: string = `Hello ${who}?`

function sayHello() {
  console.log(`Hello ${who}!`)
}
a b c d e f g h i j k l m n o p q r s t u v w x y z A B C D E F G H I J K L M N O P Q R S T U V W X Y Z 0 1 2 3 4 5 6 7 8 9
Brand Specific Font
a b c d e f g h i j k l m n o p q r s t u v w x y z A B C D E F G H I J K L M N O P Q R S T U V W X Y Z 0 1 2 3 4 5 6 7 8 9
All fonts are made accessible through npm, with each font package thoughtfully accompanied by a comprehensive guide on how to effortlessly integrate and utilize the fonts with popular tools like Vite or Next.js. The fonts are conveniently organized within the tobua/font repository, allowing for separate and independent releases to npm using the versatile @changesets/cli
For the publication of each font, a Figma template source file serves as the foundation, providing the font in the OpenType format. A meticulously crafted script then seamlessly converts these fonts into various browser-friendly formats, all thanks to the efficiency offontmin.
It's important to note that this approach, unlike traditional semantic versioning used in the npm Release Action, relies on annotations in the source code. These annotations have to be generated using a dedicated CLI tool, residing within the .changeset folder. The packages to be released, along with the desired version increments for each package, are manually configured. Releases aren't triggered directly by commits but instead involve the Changesets Action creating a pull request. This pull request carries the annotations into the changelogs for each package and adjusts the versions accordingly in an additional commit. Once the pull request is successfully merged, the action automates the release of the updated packages.
This approach has gained popularity in larger open-source repositories and, as contributors frequently generate changesets with their pull requests, it's valuable knowledge for effective collaboration. However, it's worth noting that changesets reintroduce certain versioning complexities that were previously avoided through semantic versioning. To streamline versioning and maintain clarity, it's advisable to consider alternatives such as separate repositories, exports or tree shaking.
Styling Text
As fonts are vector graphics, they offer the flexibility to incorporate a wide range of CSS effects, enhancing the visual appeal of your text content. Although the internet is teeming with creative effects, let's explore a selection of fundamental techniques that can effortlessly infuse a touch of sophistication into any webpage.
text-stroke
text-shadow
with shadow elevation inner shadow multiple shadows
Gradient Background
Gradient Background
letter-spacing
This text has more space while these characters will be closer together.
font-kerning Overlapping Characters
AWA (auto) vs AWA (none)
This feature only works when the font supports it.
font-variant
fi / 0O / 1.23
fi / 0O / 1.23
Slashed zero is not supported with the subsets provided by Google Fonts. This example uses Fira Sans downloaded from GitHub.
background-clip
Background-Clip
Animated Gradient
Gradient Border
To achieve this effect, employ a clever technique: incorporating a background-image that is precisely clipped using the background-clip property. Subsequently, you can overlay the inner section of this background with a chosen color, and the border can be rendered transparent once more, this time utilizing the text-stroke property.
Flipping Letters
To animate characters sequentially, we introduce a CSS Variable called --flip-index within the scope of each character through an inline style. This index becomes a powerful tool for managing animation-delay within the shared class.
Programmatically Working With Fonts
There are instances when you need to modify existing fonts to achieve the desired design aesthetics. However, font creation tools, which cater to this niche, can be scarce and often come with a hefty price tag. Fortunately, there are open-source, programmatic tools available that can simplify the font manipulation process. One notable tool in this category is fontkit, which enables you to load and meticulously examine and edit each glyph within a font.
For web-based font manipulation, lib-font is a valuable resource. It's specifically designed to be used within web browsers, where fonts are actually employed. This package empowers you to inspect various font properties, such as character support, which can be particularly useful when validating custom fonts uploaded by users.
Moreover, in the context of the Figma template, the script utilizes opentype.js to generate a font from the glyphs. This font can then be downloaded and is seamlessly integrated into the preview, offering a convenient way to look at the font generated by the script before downloading.
Get Your Own Custom Font
If you want a custom font to represent your brand check out my Gig on Fiverr which offers custom fonts based on this template.
This post was revised with ChatGPT a Large Language Model.