<onWebFocus />
Knowledge is only real when shared.
Testing in Web Development
June 14, 2023
Reflections on the ways and practice of testing.
Why Testing?
Despite the comprehensive coverage of various topics on this blog, one area that remains unexplored is testing. Answering critical questions about when, what, and how to test is a complex task, as it heavily relies on the specific project context and the preferences of individual developers or teams. Additionally, testing serves as an invaluable avenue for programmers to deepen their understanding of programming concepts. By experimenting with different inputs, developers can gain insights into the inner workings and behaviors of their code.
Testing plays a crucial role not only in backend development but also in frontend web development. The frontend is the face of any web application, directly interacting with users and providing them with a seamless experience. By implementing thorough testing methodologies, frontend developers can ensure the reliability and functionality of their user interfaces across various devices, browsers, and screen sizes. Comprehensive testing helps identify and resolve potential issues such as broken links, UI inconsistencies, layout problems, and performance bottlenecks, ultimately enhancing the overall user experience. Moreover, as frontend codebases grow in complexity, having a robust testing strategy becomes even more vital to catch regressions and prevent unintended side effects when making updates or introducing new features. By investing in frontend testing, developers can save valuable time and effort that would otherwise be spent on manual testing and bug fixing, resulting in more efficient and stable web applications.
When to Test?
Determining the appropriate timing for testing is crucial to ensure effective software development practices. When working with complex interfaces, it becomes more likely that your expectations of how they function might be incorrect. In such cases, testing becomes an effective means of correcting any misconceptions. However, when using familiar interfaces that you have worked with previously, the likelihood of incorrect expectations decreases.
For instance, consider the implementation of a calculator capable of performing various operations accurately, such as addition, subtraction, and multiplication. In this scenario, extensive testing may not be necessary since the functionality can be implemented using standardized mechanisms inherent to any programming language. The interfaces utilized in this case are well-tested, easily comprehensible, and relatively bug-free. In scenarios like a calculator, it becomes nearly impossible to cover the entire range of potential inputs through testing alone. Instead, well-crafted code can be relied upon with greater confidence.
On the other hand, when creating user interfaces with HTML and CSS, it is beneficial to have the actual page open alongside the code to promptly verify whether the expected output matches the observed outcome. Often, the markup remains static, and the range of inputs is limited. This allows developers to write correct code without fully comprehending the intricacies of different layout systems across various browsers. It is exceedingly challenging to implement markup without repeated testing in the browser, unless the developer has extensive prior experience. While resources like Josh W Comeau's CSS for JavaScript Developers course aim to provide a solid understanding of underlying interfaces, it is doubtful that developers can consistently create accurate layouts without repeatedly examining the results in the browser. Striking a balance between a trial-and-error approach and theoretical comprehension is essential, as the former may lead to an incorrect mental model, while the latter may unnecessarily complicate matters.
Testing serves as a reliable method to validate the correctness of an application, especially after implementing arbitrary changes. A comprehensive test suite acts as a key component in maintaining a robust and sustainable application. These tests ensure that updates, refactoring, and modifications introduced by new developers do not compromise the desired functionality. However, when developing websites that are delivered once, seldom maintained, and eventually rewritten after a few years, the need for automated testing diminishes. In such cases, extensive manual testing can be conducted to ensure thorough verification prior to delivery.
Additionally, the extent of testing required is influenced by the degree to which your code relies on well-tested and well-understood libraries and frameworks. When utilizing established or widely used dependencies, the need for extensive individual testing decreases. However, when working with new or relatively obscure dependencies, it is advisable to augment testing efforts to ensure that these components align with your expectations.
By carefully considering the complexity of interfaces, the familiarity with the technology stack, and the maintainability requirements of your project, you can strike a balance between effective testing practices and efficient development workflows.
What to Test?
Determining what to test is a critical aspect of establishing an effective testing strategy. Tests can be categorized as either end-to-end tests, which cover the entire application, or unit tests, which focus on specific encapsulated parts or components. The choice between these approaches depends on the application's context and the implementation approach employed. Experienced developers often possess an intuition regarding which areas require comprehensive and dedicated testing and which can be adequately covered by end-to-end tests.
While end-to-end tests may not delve deeply into each individual component or part, unit tests allow for thorough examination of various use cases specific to a particular component. By conducting unit tests, developers gain the advantage of easily tracing the root cause of any failures, as the scope is narrowed down to a specific unit or module.
In addition to component-level testing, it is crucial to test applications in different environments, including various browsers, devices, and operating systems. The diverse landscape of user configurations necessitates verifying the compatibility and functionality of the application across a range of setups. By performing testing in different environments, developers can identify and address any potential issues that may arise due to platform-specific variations.
Expanding on the topic, another aspect to consider is integration testing. Integration tests focus on verifying the proper communication and interaction between different components or modules within the application. This type of testing ensures that the integrated parts work harmoniously and fulfill the expected functionality. By simulating real-world scenarios and validating the seamless integration of various components, integration testing provides valuable insights into the overall performance and reliability of the application.
Additionally, incorporating performance testing is essential to assess the responsiveness, scalability, and efficiency of the application under different load conditions. Performance testing involves subjecting the application to simulated user traffic and measuring key metrics such as response times, resource utilization, and throughput. By identifying performance bottlenecks and optimizing the application's performance, developers can ensure a smooth user experience even during peak usage periods.
Overall, adopting a comprehensive testing approach that includes end-to-end testing, unit testing, integration testing, and performance testing, while considering different environments, empowers developers to build robust, reliable, and user-friendly applications.
How to Test?
When it comes to testing, there are two primary approaches: manual testing and automated testing. In manual testing, the application is run by a human tester who interacts with it in various ways to verify if it meets the expected behavior. On the other hand, automated testing involves writing code-based tests that can be executed automatically, rapidly, and repeatedly. The choice between these methods depends on the specific context of the application. User interfaces lend themselves well to manual testing, as they can be easily assessed by human testers. Conversely, more programmatic interfaces provide an opportunity for efficient implementation of automated tests. Additionally, there are specialized tools available to execute automated tests within browsers, streamlining the testing process for web applications.
Browser Testing
Browser testing is an essential aspect of frontend development, and the default approach for many developers is manual testing by trying out the website in the browser while working on specific features. Typically, developers opt for the most popular browser, such as Chrome, to ensure basic functionality. Fortunately, Chrome adheres well to web standards and utilizes the Blink browser engine, which is also shared by newer versions of Microsoft Edge. The Blink engine is similar to the WebKit engine used by Safari and Chrome on iOS. Firefox, with its Gecko engine, is also a popular browser choice among developers. The advent of evergreen browsers, following the end-of-life for Internet Explorer 11, has significantly improved the browser landscape for web developers. These evergreen browsers automatically update themselves, reducing the time between feature standardization and developers' ability to leverage these features. Websites like caniuse.com provide browser usage statistics, further emphasizing the importance of testing across different browser environments.
While testing in various browsers is crucial, it is equally important to prioritize mobile testing, with tablet devices playing a lesser role. Although responsive views for mobile can be simulated to some extent in regular browsers by adjusting the window width, it is highly recommended to conduct testing on actual mobile devices to ensure an accurate representation of user interactions and gestures. Safari on an iPhone and Chrome on an Android device are the primary choices for mobile testing. Furthermore, it is worth noting that there can be variations in browser behavior across different operating systems. For instance, Chrome on macOS may exhibit different behavior compared to Chrome on Windows.
To streamline the testing process for different browsers, physical devices, and operating systems, web developers can leverage services like Browserstack. While the service comes with a price tag of $39 per month, it offers significant value for professional web developers. Browserstack allows for seamless interaction with virtually any browser on real mobile, tablet, or desktop devices, providing an almost indistinguishable real-time testing experience. Additionally, Browserstack offers a browser extension that enables developers to tunnel their locally developed sites, such as localhost:3000, through the service for comprehensive testing.
Jest 🃏 and Vitest 🚀
jest has long been the go-to choice for frontend testing and has historically been the most popular testing library. However, it's worth noting that over the years, Jest has lost some of its zest compared to other libraries from Facebook Open Source. While many of these libraries have seen a decline in popularity, Jest continues to maintain a strong position in the testing ecosystem. Just as Rspack complements webpack, there is another noteworthy library called vitest. Vitest offers a familiar testing API similar to Jest and is highly recommended for both new projects and migrating existing ones. Not only is Vitest considerably faster, but it also has built-in TypeScript support and works seamlessly with ES Modules, an area where Jest has faced challenges for years. Although Vitest inherits the architectural quirk of using two bundlers from its underlying foundation, vite, this does not result in any actual issues. Personally, I have always had a pleasant experience using Vitest. While historically associated with the Vue ecosystem, both Vitest and Vite are versatile tools that work equally well with React. However, when working with React Native, Jest remains the primary choice as there is currently no viable integration available for Vitest.
In addition to Jest and Vitest, libraries such as @testing-library/react provide a powerful approach to testing React application code without the need to run tests in a browser. This method offers faster test execution compared to browser-based testing and proves highly useful for testing rendering behavior.
TypeScript Types
When writing reusable code in TypeScript, one of the challenges is ensuring that the type signature remains intact after making changes or updates. Thankfully, TypeScript offers a useful tool called the // @ts-expect-error annotation. This annotation allows you to specify certain cases where an error should be thrown, ensuring that your code fails if the expected error doesn't occur. In the context of testing with Vitest, if the TypeScript error isn't triggered as expected, the test will fail, alerting you to the issue. To further enhance your testing capabilities, there are dedicated packages available, such as tsd and conditional-type-checks. These packages provide additional assertion mechanisms tailored to specific types, enabling you to perform more comprehensive tests on your TypeScript codebase.
Cypress 🍋, Puppeteer 🧸 and Playwright 🎭
cypress has established itself as the gold standard for UI testing, offering a comprehensive solution for testing web applications. One of the standout features of Cypress is its custom user interface, specifically designed for running tests directly in the browser. This unique approach enables developers to easily inspect the UI and interact with elements during test execution, facilitating faster debugging and enhancing the overall testing experience.
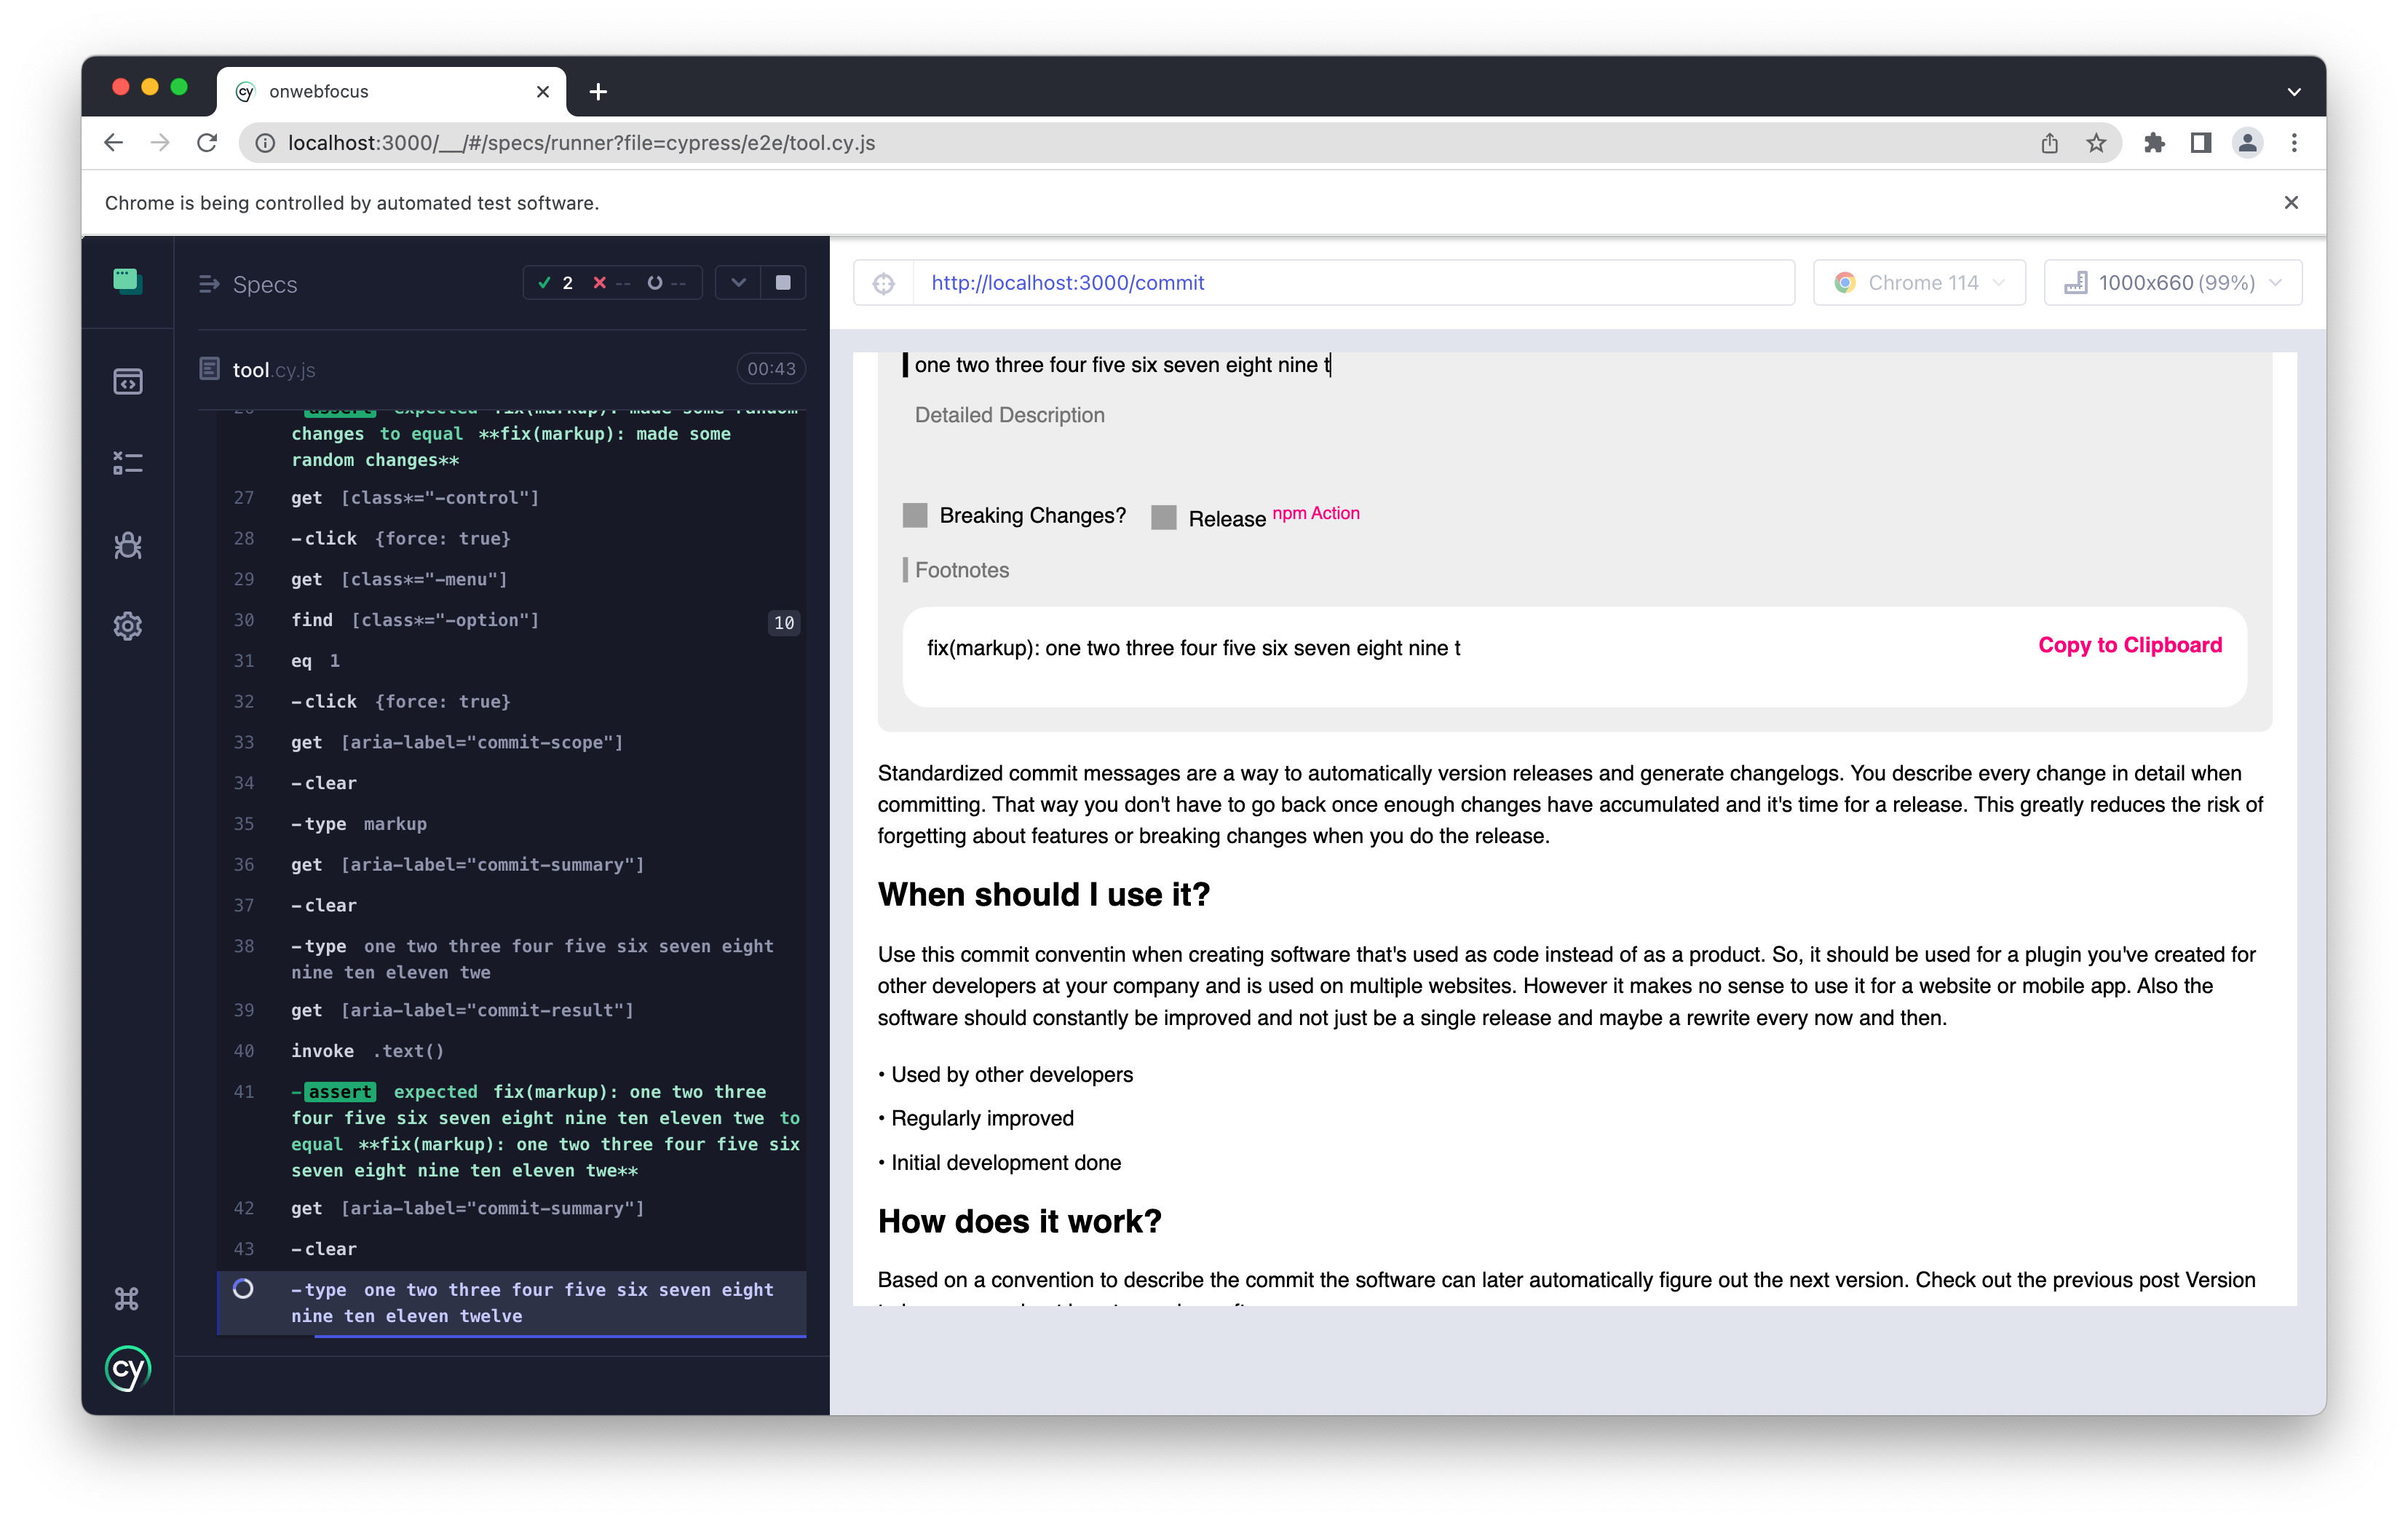
Screeshot of Cypress tests running on the Commit tool included in this blog.
puppeteer emerged with the concept of programmatically accessing the contents of a headless Chromium browser, making it a valuable tool for tasks like web crawling or taking screenshots of websites. It can also be seamlessly integrated with testing frameworks like Jest or Vitest, enabling the execution of regular tests. playwright, on the other hand, aims to excel in providing a broader range of capabilities. It can operate headlessly on multiple browsers, including Chromium, Firefox, Edge, and Safari. Furthermore, Playwright offers testing utilities that closely resemble the familiar interface of Jest. This powerful combination empowers developers to swiftly create UI test suites that run efficiently across various browsers.
The above code snippet is from a playwright test written to test an electron application that lists the assets of this blog.
jest-fixture to Create and Test Files
In my experience of building tools and libraries that interact with files, I often encountered the requirement to swiftly set up a project with a dynamic file structure on the local file system for running tests. This is where jest-fixture comes into play, offering a streamlined solution to simplify this process. With jest-fixture, developers gain access to a method and accompanying helpers that facilitate dynamic file setup at the beginning of tests directly within the code. Moreover, jest-fixture includes a polyfill specifically designed to seamlessly integrate with vitest, enabling smooth compatibility between the two.
node Test Runner
Starting from the current stable version 20 of Node.js, a built-in test runner is now included. Although it is still recommended to use dedicated testing tools in most cases, it's worth exploring and leveraging the built-in test runner for smaller projects or those with stringent performance requirements. To give it a try, set up a package.json file with the following content: { "type": "module" }. Additionally, create a basic.test.js file with the desired test contents. Once the setup is complete, the tests can be executed using the command: node --test basic.test.js.
One useful feature that I recently discovered and now regularly utilize is the test.only(...) functionality. By adding .only to a specific test, you can ensure that only that test is executed, which is particularly convenient when adding new tests and temporarily bypassing others that are currently irrelevant. In Node.js, this functionality requires passing { only: true } as the second argument to the test function, and the tests need to be run using the --test-only flag. It's worth noting that caution should be exercised when using this flag to prevent accidentally committing code that skips all other tests during continuous integration (CI). However, Vitest addresses this concern by defaulting its --allowOnly flag to true locally and false when run on a CI platform like GitHub Actions.
When it comes to working with TypeScript or JSX for React projects, integrating them with the built-in Node.js test runner is not straightforward. Except for very simple projects, it is recommended to use dedicated test runners that offer better support for TypeScript and JSX.
GitHub Cache Action
Continuous integration is an invaluable practice as it automates running the entire test suite after every commit. However, running the complete project test suite with GitHub Actions or similar platforms can consume significant resources, despite the minimal differences between consecutive runs. To address this, GitHub provides the action/cache, a powerful feature that enables the caching of artifacts between runs, resulting in faster subsequent runs.
The Cache Action operates by storing the contents of specific folders and intelligently skipping steps in the job flow if the folder is already present in the cache. For web developers using Node.js, the most crucial directory to cache is node_modules, which would otherwise need to be downloaded anew for every run. The following example demonstrates how to integrate this action into the steps of a GitHub Action workflow. The key distinction is the inclusion of an if: condition in the installation step. This condition references the outputs of the cache action using a pre-defined id.
Ensuring the dependency cache remains up-to-date when new dependencies are added or existing ones are updated is the only aspect that requires attention in this process. To achieve this, you can utilize the key variable. Many developers choose to commit the package-lock.json lockfile (which serves as a type of cache) into the source code. Since this file is updated whenever dependencies change, it can be used to dynamically generate the key, such as key: ${{ runner.os }}-${{ hashFiles('**/lockfiles') }}. It is recommended to include the operating system in the key since the downloaded contents of low-level dependencies often vary depending on the requesting system. In the provided example, the cache is updated whenever any package.json file changes, which generally works well as all necessary dependencies are listed there. However, issues may arise when new dependencies are published that fall within the specified version ranges. To address this, adding a date to the key, as described in the official Creating a cache key documentation, ensures that the dependencies are never older than a day. Alternatively, you can update the dependencies by including an npx npm-check-updates -u step before generating the key.
Caching is one of the most crucial performance techniques, but it has also caused developers numerous headaches. When an action fails due to an outdated cache, the cause is often not immediately apparent, leading to unnecessary debugging efforts in other areas. To avoid such situations, the cache action should be used judiciously. The shorter the time between test runs, the more significant the impact of caching becomes. This makes caching particularly appealing for repositories with large teams that make numerous daily commits, as it can greatly improve performance and efficiency.
This post was revised with ChatGPT a Large Language Model.