<onWebFocus />
Knowledge is only real when shared.
Rolling a Better Authentication
October 13, 2024
Improving and integrating the iltio.com authentication service.
This post discusses various topics related to authentication. In a previous post, I introduced the iltio.com authentication service. I'll explain what JSON Web Token is and how I added it to iltio, in addition to the less performant webhook authorization method. Nowadays, people want their data encrypted, but there is no way to store encrypted data in an external service if the encryption happens on the server. To resolve this issue, I'm adding client-side encryption and the necessary UI helpers, namely the iltio plugin, to make integration into any client effortless.
Additionally, this post will cover the migration from MySQL to Drizzle ORM and how another essential Backendless service—logging—was added.
Authentication can be incredibly complicated, and this complexity often impacts the user, who has to go through various steps just to authenticate. Currently, only authentication through email or phone is possible, but in this post, I'm evaluating other simpler, cheaper, and more futuristic verification methods. Lastly, I'll present a new PWA I'm launching that uses client-side encryption provided by iltio. That way, you won't have to worry about me reading any of your things.
🚧 Keep in mind that this service is in active development and may not be fully production ready yet. If you're planning to use it for a production application please let me know. The current preview is free to use and for accounts registering now it will always remain free.
What is iltio.com?
This Backendless service aims to provide seamless integration of authentication into any web-based application. It is Backendless, as it can be directly integrated into any application without the need for a database or changes to the server.
It allows your users to register or log in using the same form, with verification possible through email or phone. Authentication does not require any redirects, and the login flow is fully customizable using forms available for any framework, making it easy to integrate into most applications.
Cryptographic Authorization with JWT
When a user logs into an application through iltio, they receive a token that can be used by other services to authorize access via a webhook. The issue with this approach is that each time a service accesses a resource, a significant amount of time is lost making the webhook call. Fortunately, there is a secure cryptographic method that allows users to connect to services without the need to repeatedly call the webhook. By implementing caching, the webhook is only triggered once for the same token, but a caching mechanism (such as a database or table) is required on the server. Initially, the first call is always necessary, leading to higher latency when the user first accesses the application.
This technique is known as JSON Web Token (JWT). When a user authenticates with iltio, an encrypted token containing specific information is communicated to the service. The token is protected from being read or tampered with by the user. It can only be used to access the resources it grants, and it automatically expires after a set period.
JWTs can also be signed using the RSA algorithm. In this case, anyone with access to the public key can read and verify tokens, but only the issuer (holding the private key) can create new tokens. This ensures that the server validating the token for resource access cannot issue tokens itself, as doing so would require the private key.
The example above shows a decrypted token. The iat field indicates the time the token was issued, while the exp field denotes the expiration date. In addition, the token contains Hasura-specific claims that can be used to grant users access to protected resources. In this case, iltio will always assign the role user and provide a uid, which ensures that data stored in a table is accessible only to the user. This is a common use case for many applications.
Issuing a token is relatively straightforward using the jsonwebtoken package. The claims are passed as the first argument, the secret key as the second, and the algorithm, along with the expiration date, can be configured in the third argument.
For a resource service like Hasura, all that's required is either a link to the webhook, which can be set in the console using the HASURA_GRAPHQL_AUTH_HOOK environment variable, pointing to https://iltio.com/api/hasura, or by setting the HASURA_GRAPHQL_JWT_SECRET, which can be obtained by logging into iltio and enabling Hasura integration in the Integrationtab.
RSA Public Key Algorithm
iltio also supports authorization using the RSA public key method, which is equally effective and can be considered somewhat more secure. To ensure that your users receive a JWT signed with this method, select public as the algorithm in the Integration tab on iltio.com. This will also display the HASURA_GRAPHQL_JWT_SECRET value containing the public key, which you need to add as an environment variable in Hasura.
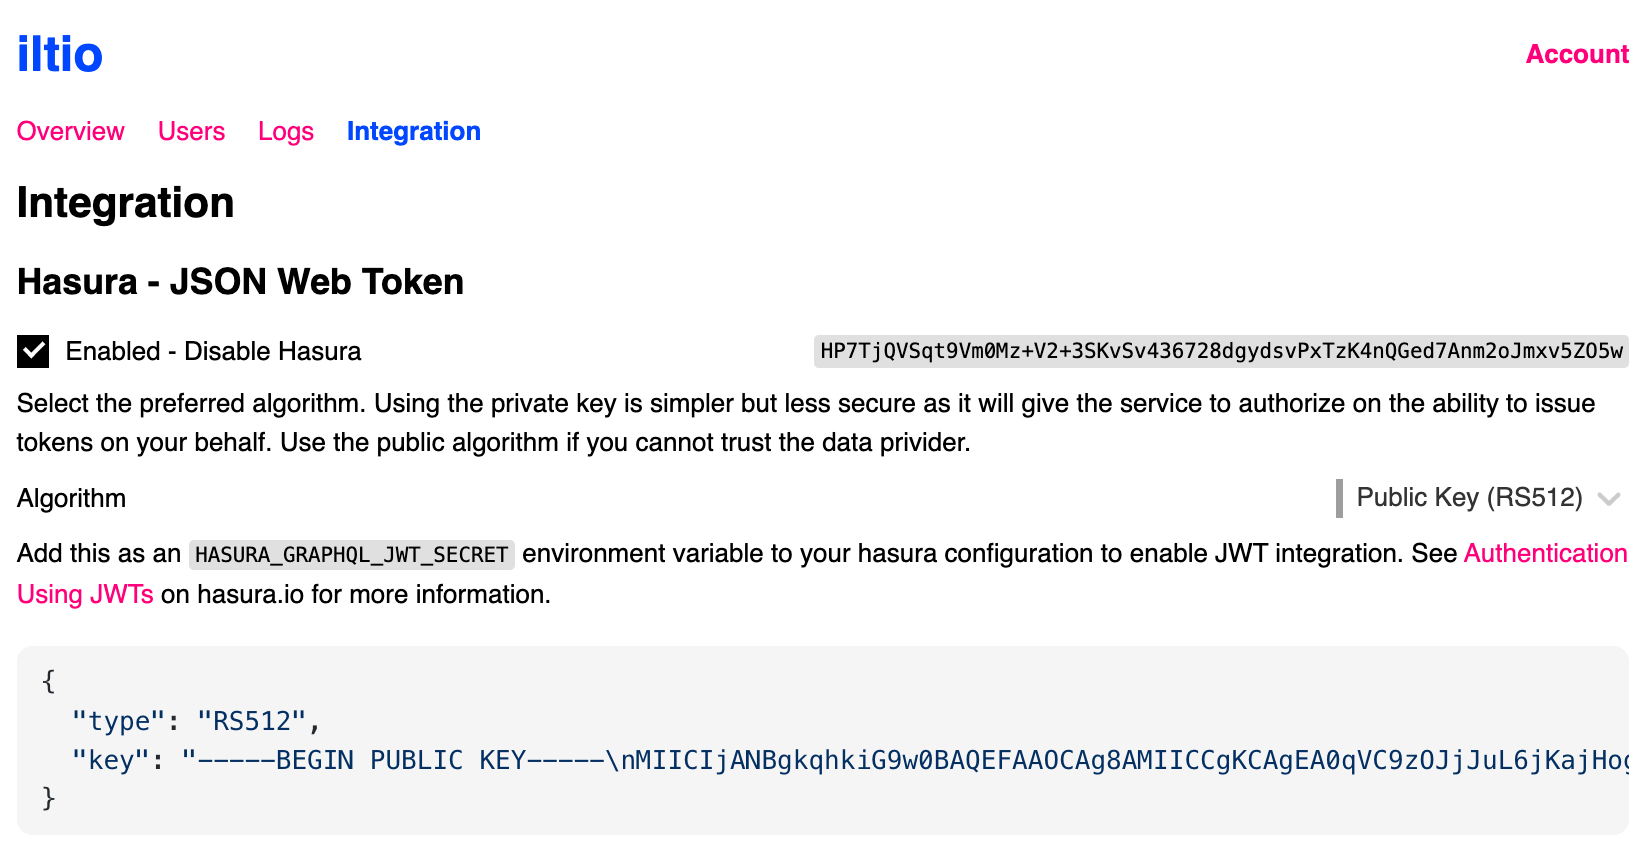
Screeshot of the Hasura integration interface.
While iltio handles creating the private and public keys as well as signing the JWT, it's relatively straightforward to do this yourself. To issue RSA keys on your own, you first need to generate RSA private and public key pairs locally, which you will then place on your server.
The command above will generate two files: one containing the private key and the other containing the public key. You need the private key to issue valid JWTs to users, while the public key can be distributed to services where users need to authorize access.
Adding JWT Verification to your Service
Adding JWT authentication to your service is, aside from using a simple webhook, one of the easiest ways to allow developers to verify that a specific user is authorized to access a resource. If you want to make your application compatible with iltio, you can use thejsonwebtoken package to verify tokens from users. The algorithm will be automatically detected based on the token, and our options are included in the default settings.
Backendless Privacy
When it comes to user data privacy, two issues arise. The first is on the login provider's side, as there is no way to ensure the provider will not be able to log in as any user on your platform. Even if you host the authentication yourself, the verification provider can still bypass the authentication. The second issue is that the provider storing your data will have access to it in clear text, even if it is later stored in an encrypted format.
With iltio.com, I'm trying to solve both of these issues by adding optionalclient-side encryption to guarantee full user privacy wherever possible. This is achieved through the iltio plugin, which offers helpers to encrypt and decrypt all data sent to the server in requests. This way, the data remains private as the key is only stored on the client. All data that arrives on the server is already encrypted. Obviously, this will not work for some types of data that need processing on the server. However, this should only be done with non-sensitive fields, and in a Backendless architecture, this will rarely be needed anyway.
The Encrypt component serves multiple purposes. First, it allows the user to generate a client-side encryption key used to encrypt any sensitive data sent to the backend. Once encryption is enabled, the key is stored on the client, and the user should also back it up somewhere. On the server side, the iltio.com authentication service will flag the user as having enabled encryption. The Encrypt component then allows the user to remove the stored encryption key (without logging out) or disable encryption altogether. If the key is removed, Encrypt will prompt the user to re-enter the key. Additionally, when encryption is enabled, the Encrypt component will automatically appear as an additional step in the login flow.
To ensure the Encrypt component is displayed when appropriate, there is also aisEncrypted helper that returns the current state. When the user has encryption enabled, the Encrypt component will automatically be shown after successful authentication.
Using the encrypt method, it is possible to quickly encrypt any data before it is sent to the server. The encrypt method will recursively traverse all JSON-compatible data types and encrypt any value, except those under properties listed as the second argument.
Storing the Encryption Key
Since the encryption key must be stored on the client, it's necessary to use one of the available methods for secure storage. Once the key is lost, the data cannot be recovered, so it's essential to ensure the user can easily and safely store their key. The simplest method is to ask the user to write it down or save it somewhere. The drawback of this method is the lengthy retrieval process and the need for manual typing of the key.
Some people may fail to store their encryption key safely. Therefore, for the future, especially if your application is encrypting sensitive information that cannot be lost, I am considering adding recovery methods to retrieve a lost key. However, with client-side encryption only, this can be much more difficult.
Validating the Encryption Key
When the user encrypts their data and logs in again, they will be prompted for their encryption key. Since the encryption key is never stored on the server, it's difficult to verify and display to the user whether they have entered the correct key. To achieve this essential validation, an encrypted version of the text "Hello Encryption" is sent to the server and stored there. Although the clear text is known, there is no way for the server to guess the encryption key from this. However, on the client side, the login process can attempt to decrypt the message using the key entered by the user and validate it this way.
Encrypting and Decrypting Existing Data
If encryption is enabled when the user already has unencrypted data stored on the server, it won't automatically be encrypted. Retroactively encrypting data already sent to the server in clear text doesn't make much sense. Therefore, only new additions or updates to old data will be encrypted.
What if a user turns encryption off? In this case, the user no longer needs privacy, and it is safe to send the encryption key to the server, where everything can be decrypted in one go.
Understanding the Authentication Flow
HTTP routes are usually used in a specific flow similar to a state machine. The existing interface documentation makes the login flow quite difficult to understand. To address this, I've created a new graphic that should greatly simplify the quick understanding of the authentication flow.
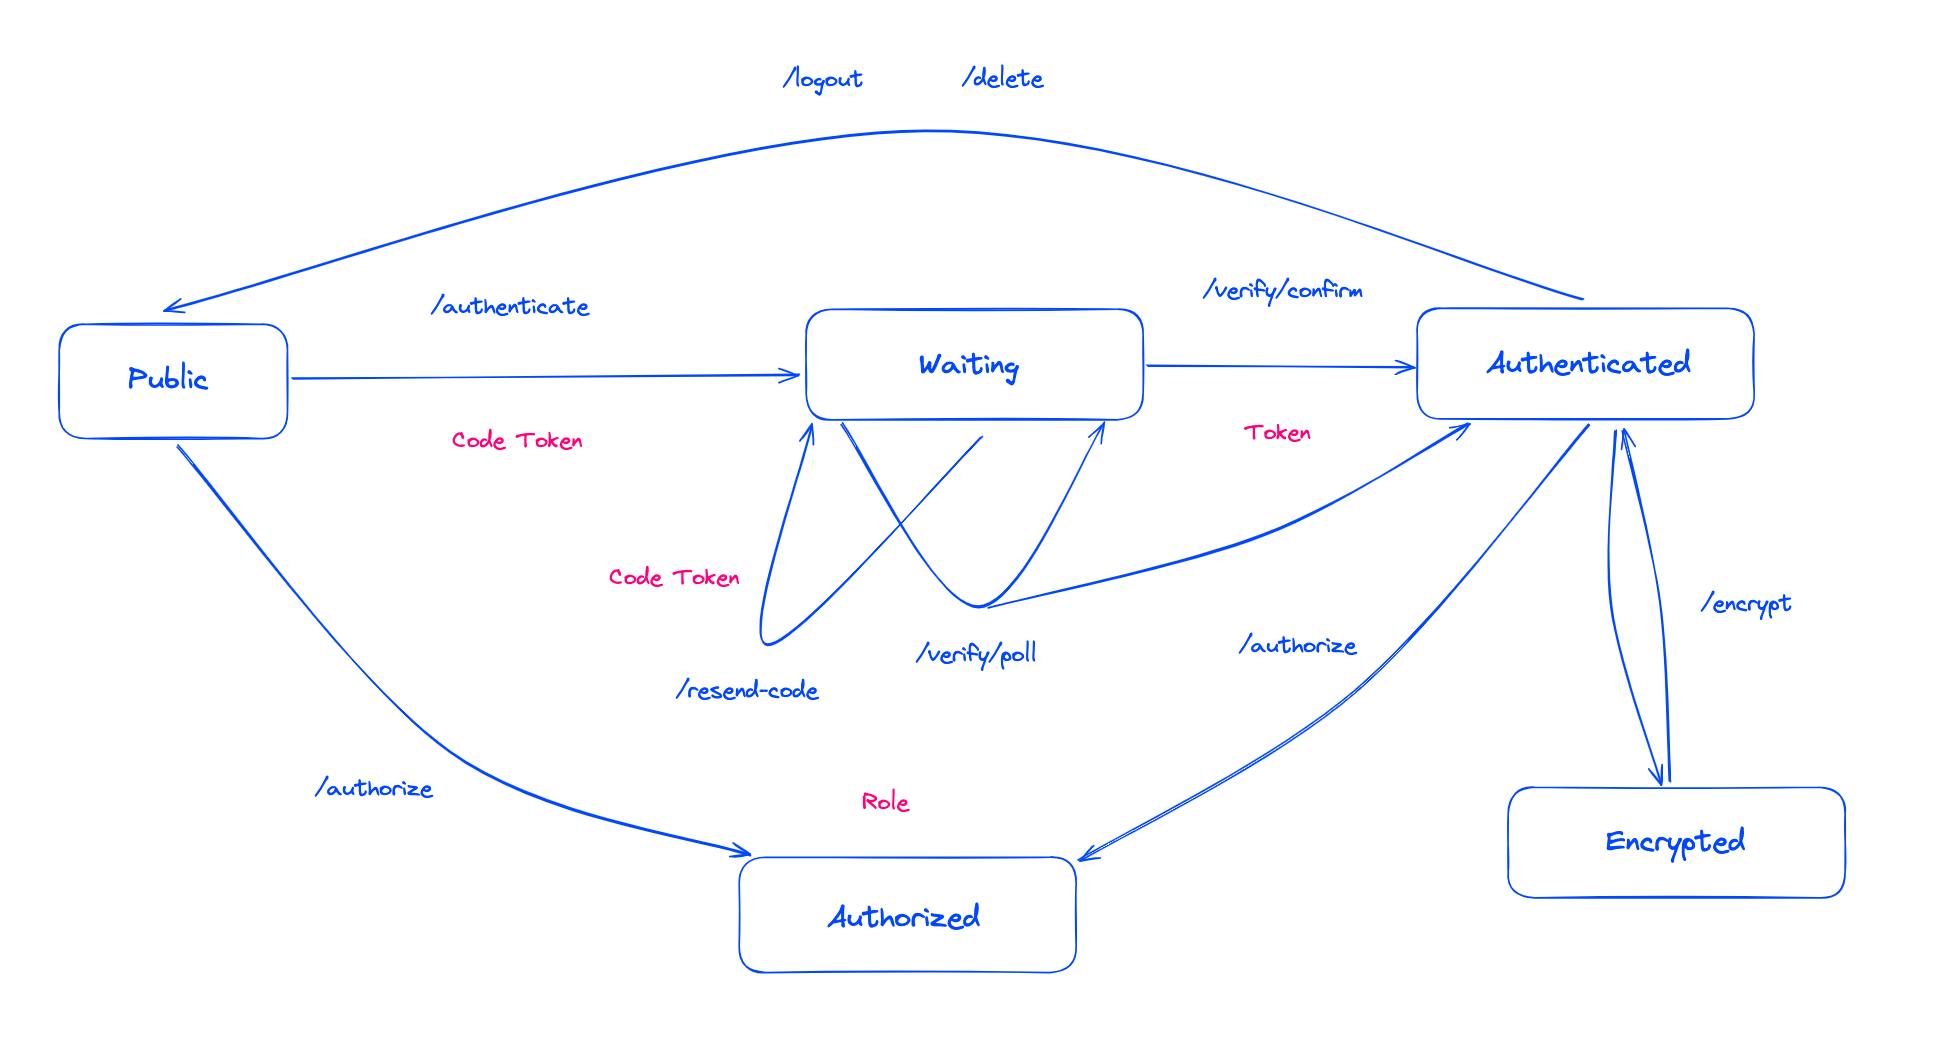
Chart of the authentication flow.
Since encryption is meant to happen on the client, there is only one new route that will inform the service whether a certain user has encryption enabled on their account. When using any of the provided plugins for various frontend frameworks (encryption is currently only supported for React), this flow is already implemented and should work out-of-the-box.
Migrating MySQL to Drizzle ORM
Previously, I hosted the database on PlanetScale using MySQL, whose syntax I still remembered well from my old PHP days. With PlanetScale removing their free tier this month (and the application not yet being commercial), it was time to move to another database provider. Neon is offering free Postgres databases, which are perfectly suited to work with Vercel serverless functions.
While the differences between MySQL and PostgreSQL syntax are negligible, it was time to move to a serious ORM solution. Drizzle recently came up, and according to the Drizzle ORM in 100 Seconds video by Fireship, it should be fairly straightforward to use.
An ORM (Object-Relational Mapping) is an abstraction layer between the data accessed in the code and the actual data stored in the database. Unlike a database UI like Hasura, you still have to manually define the database schemas in code. However, once that's done, you'll get full TypeScript support when accessing your data through Drizzle. One of the most obvious tasks to assign to an LLM (Large Language Model) is converting an old MySQL migration to a Drizzle schema. However, since this plugin is so new, this is not something ChatGPT can do for you yet. The Drizzle documentation also does not offer a way to convert old schemas to match their syntax, so you're left to read the documentation and do it yourself. One advantage of Drizzle is that it supports nearly any database and plugin, as well as any SQL syntax. At first, this can be somewhat overwhelming until you identify the parts you actually need, which for an ORM are few.
While Drizzle already looks very polished, it still has some rough edges. For example, it has a practical Drizzle Studio that can be used as a client to view the database. However, each time the schema is updated or the database URL changes, I've had to restart macOS for any changes, which seem to be cached somewhere, to be reflected. Shellscape on 𝕏 has also mentioned that Drizzle Kit, which is responsible for migrations as well as the studio, isn't yet open source and has some glaring bugs. It's too early to say whether this will become a problem, as Drizzle itself is still fairly new and there seems to be a dedicated team of maintainers working on Drizzle and the Kit. Drizzle has managed to find several database providers—Turso, Xata, and Neon—that sponsor their project.
Adding Backendless Logging
The EPIC Framework is a frontend framework I'm developing, which I have previously mentioned. The framework is guided by the idea of a Backendless future, in contrast to most current frameworks that are reverting to a server-driven architecture. However, this post isn't intended to go into the reasons why Backendless makes sense, as this is simply implied for now.
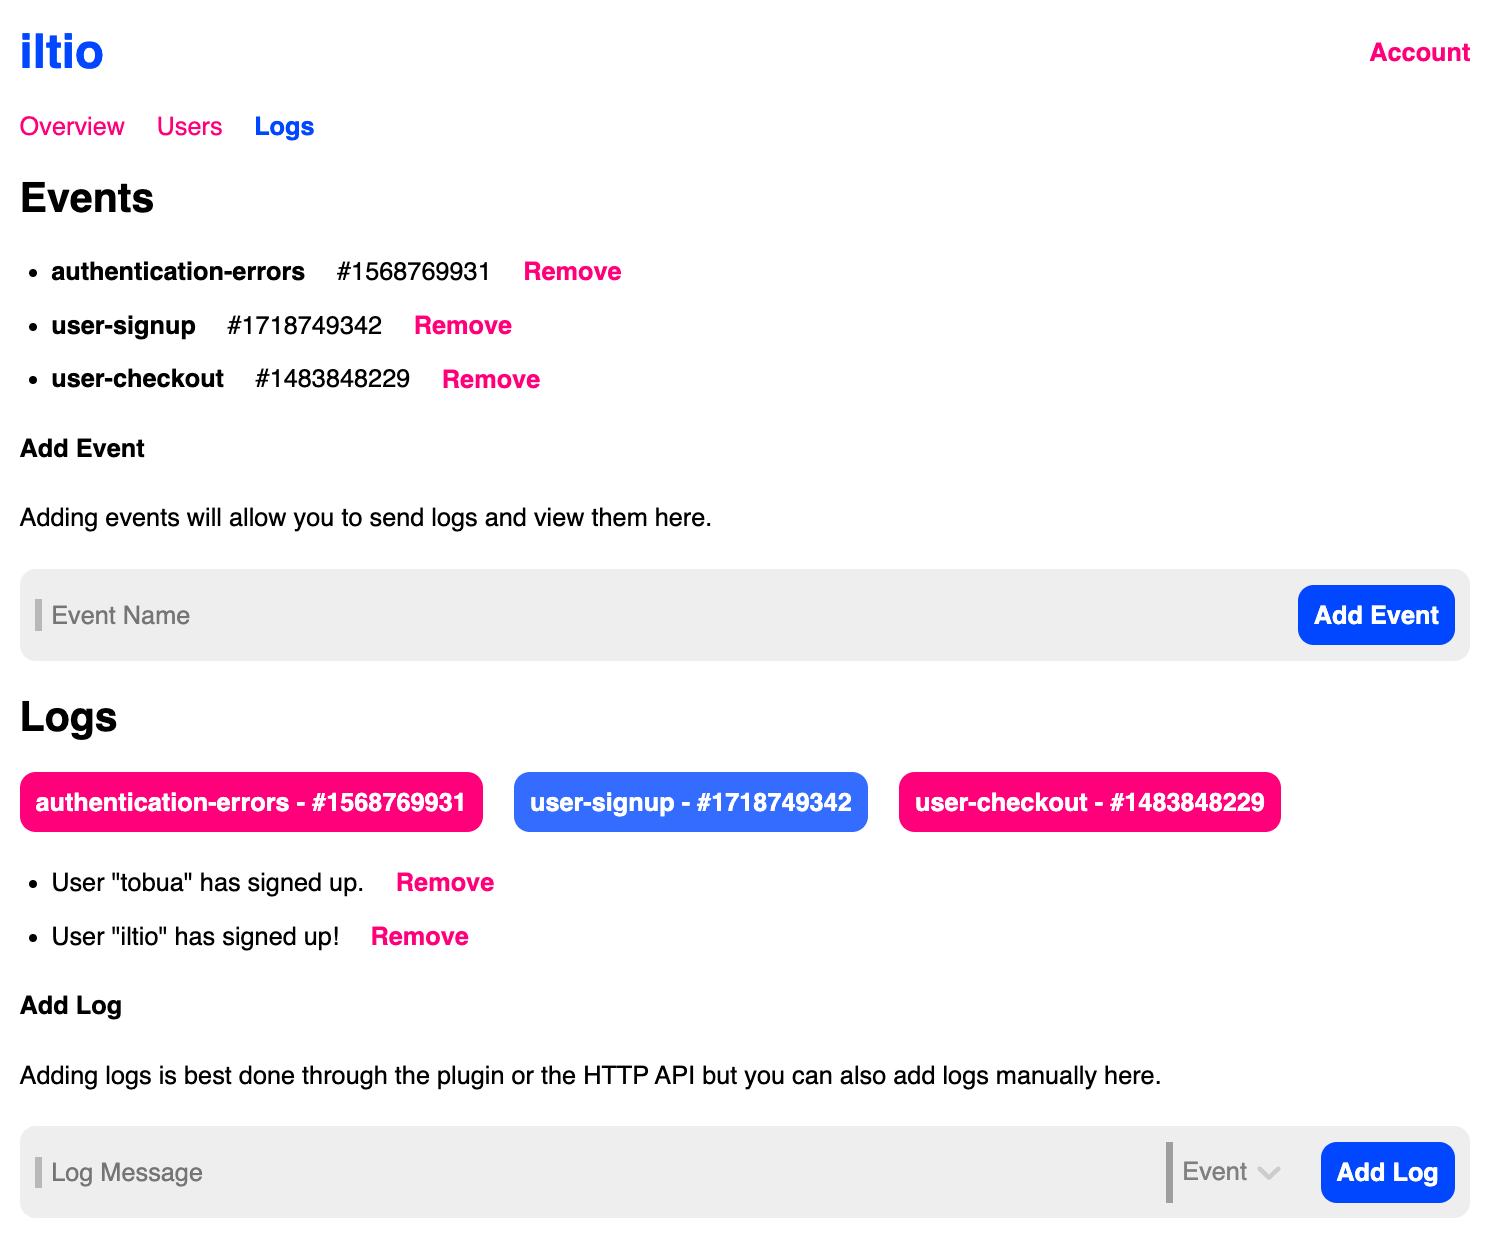
Screeshot of the current logging UI.
iltio.com aims to complement Backendless implementations by providing simple interfaces that can be directly accessed from the client. Authentication is probably the most obvious service that can be provided externally for any application. Another essential service is logging, also referred to as observability or analytics. The idea is to register events that can then be called either from the client or a Serverless function to log specific activities. While anything can be logged, it's best to log as little as possible. Good examples include logging a new paying customer signing up or an unexpected error occurring. Whenever you log in to iltio.com, you'll get an overview of all the events that have been logged recently. This is an essential way to stay on top of how your application is performing. In the future, you'll also be able to receive notifications for specific events, groups of events, or even more custom triggers.
Logging itself is pretty straightforward. Once an event is set up, you can send logs through the log helper or make an HTTP POST call to the iltio log API. To log something, you'll need the message as the first argument and the event ID as the second. You receive an event ID after creating an event in the iltio interface.
Exploring Further Verification Methods
One of the most effective ways to prevent abuse on your platform is through solid verification methods. Verification only needs to happen once during registration. Iltio currently offers registration via email or phone. Phone verification provides a certain guarantee, as in most countries, you need to identify yourself to obtain a number. If you commit a crime on the platform, your number can be reported to the police and traced back to you. This is not the case with email. However, phone number verification through text message can be quite costly, especially when also used to authenticate users upon each subsequent login.
Unlike in everyday life, there is a distinct culture of privacy on the internet. This allows bots to proliferate on social media platforms, where the problem is most obvious. The threat of possible punishment is often enough to deter abuse from a platform, yet most platforms haven't implemented solid verification methods. Often, AI is used to detect automated behavior, but this approach hasn't been very successful, as bots simply use AI to mimic human behavior.
What further verification methods are there? On 𝕏, Elon Musk recently implemented verification through a small cash payment. This can effectively combat bots, as most are used to cheaply distribute advertisements, and as soon as that is no longer cheap, they will disappear. World ID is a cryptographic approach that scans people's biometric data with a dedicated physical device. While this cryptographic approach guarantees that users cannot be traced back, it ensures that each registering user is a unique human. This can prevent spam or keep it low enough to be manageable. When an application is specific to a country, something like SwissID is also feasible, where the provider ensures that the user's ID is verified.
gowli.com Authentication and Client-Side Encryption used in a PWA
To demonstrate how this functionality can be useful, I've added it (and primarily developed it for) a PWA that serves as a collection tool for your social media posts. While some people post whatever comes to mind, I'm more comfortable jotting down ideas as they arise, reflecting on them, and deciding later whether to post or not. For people like me, who use platforms like 𝕏, gowli is the perfect tool for storing drafts. The app also features an AI-powered text editor to help you improve your messages before posting. LLMs excel at correcting grammar and enhancing overall readability.
To synchronize your drafts across devices and prevent data loss, the app includes built-in server synchronization. When client-side encryption is enabled using iltio, none of your messages are sent or stored unencrypted, ensuring that only you can read them on your devices. Synchronization is optional, and the app also offers PWA persistent storage and a backup feature to safeguard your drafts.
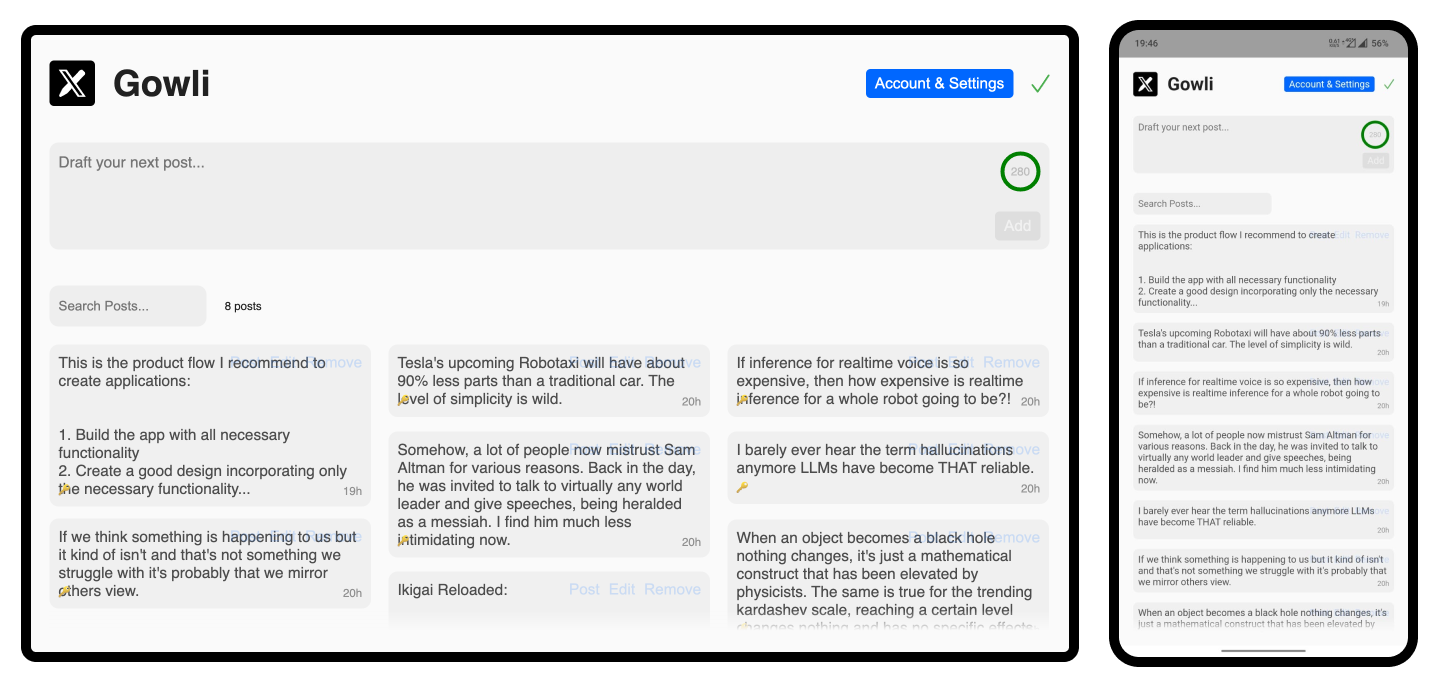
Screeshot of the gowli website and mobile PWA.
For the responsive masonry grid, the app uses two plugins I recently published in TypeScript: masua and overflow-scroll-fade. So far, I haven't encountered any issues, except with avait, which I'm using in the Serverless functions. It doesn't work in that environment because there's no bundler, and even the upcoming TypeScript 5.7 won't be able to rewrite paths the way a bundler would.
Just as I use ChatGPT to enhance the writing and grammar for these blog posts, I also rely on it before publishing any content. However, using ChatGPT involves a separate step before publishing, which can sometimes be tiresome. With gowli, this process is built directly into the editor, allowing you to improve the grammar of a post with just one click. You can choose from four AI models: GPT-4o by OpenAI, Llama 3.1 70B on Groq, Claude 3.5 Sonnet by Anthropic, and Gemini 1.5 Flash by Google. While the differences between these models may not be significant, it's still nice to have the option to select your favorite.
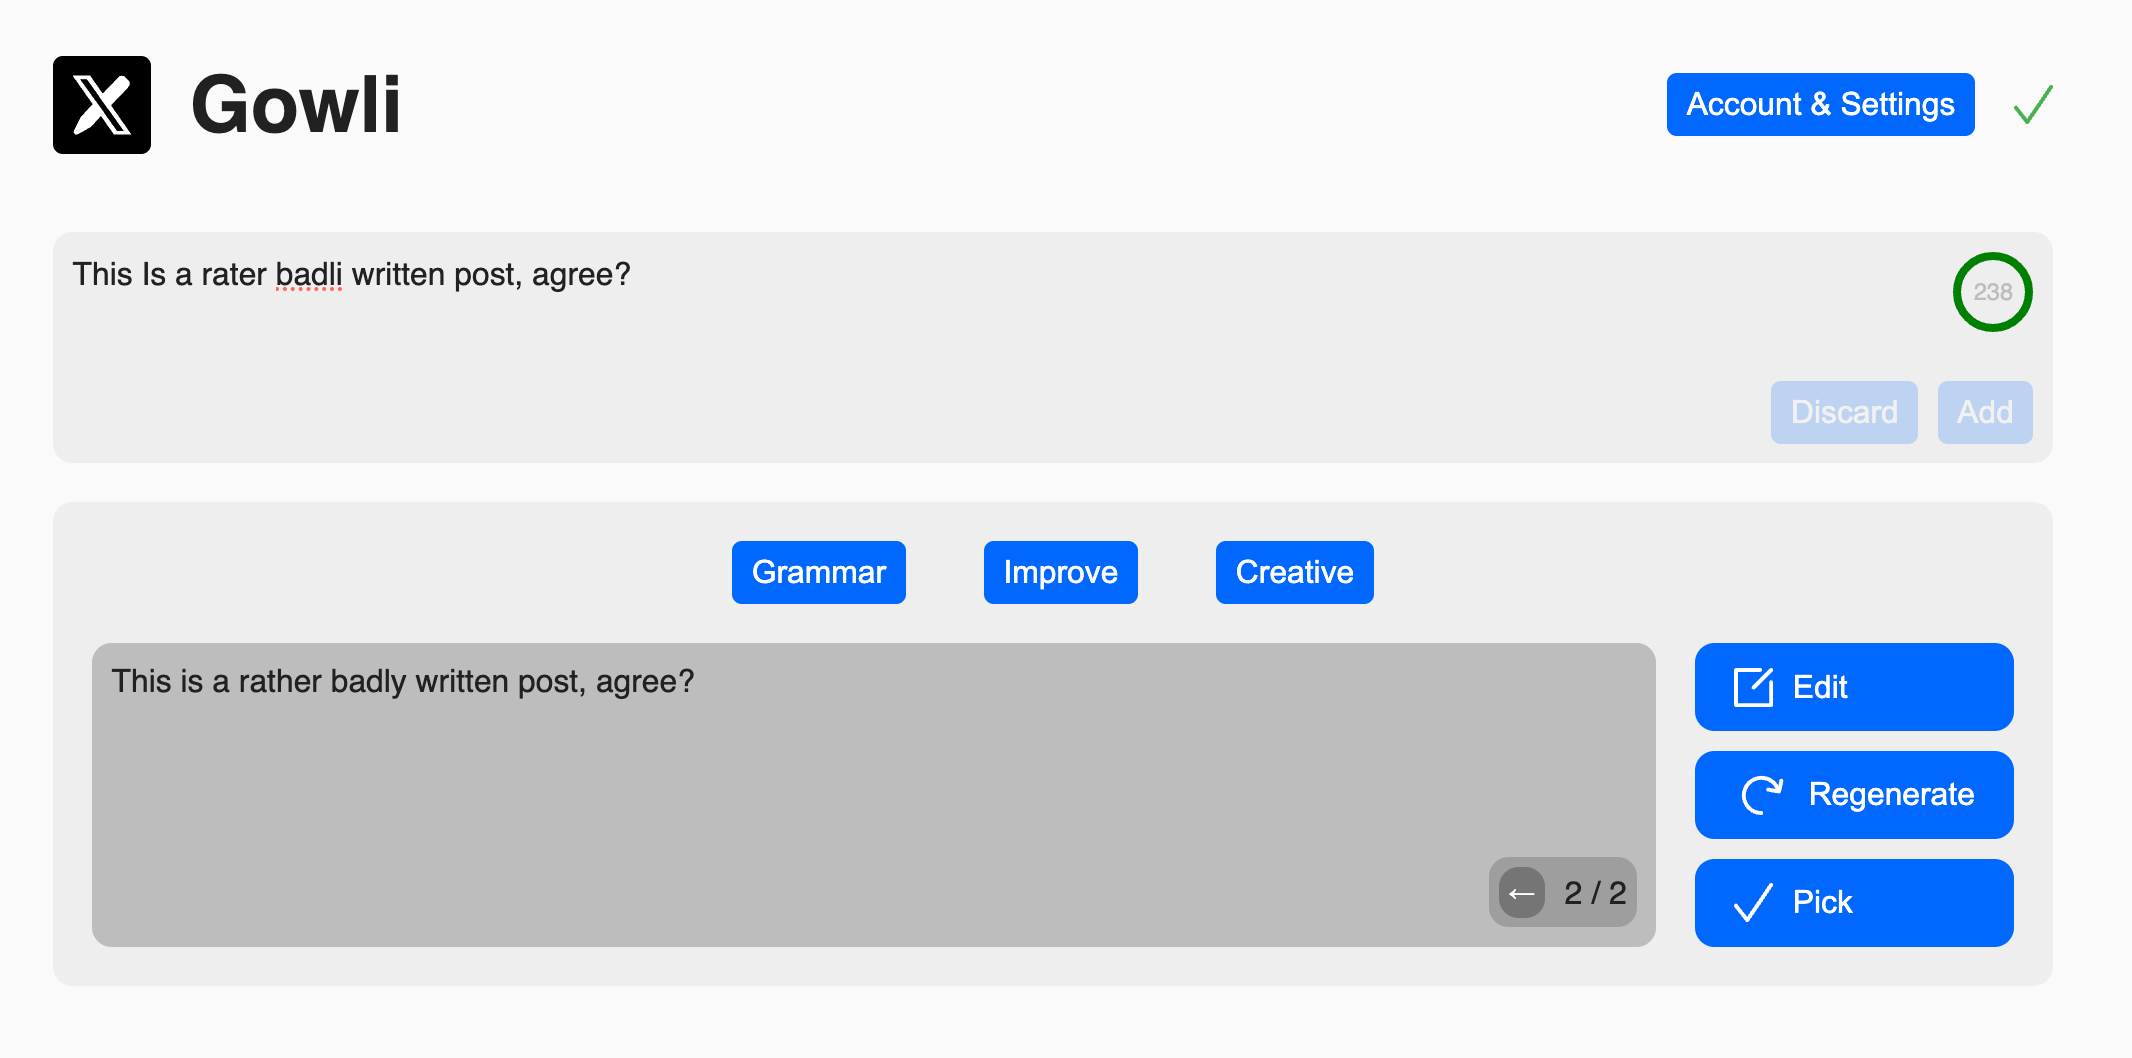
Using gowli's AI to improve a post before publishing it.
The settings modal shown below, accessed via the top-right button, allows you to log in, enable encryption, select the AI model, install the PWA, check PWA persistence, and create or retrieve backups.
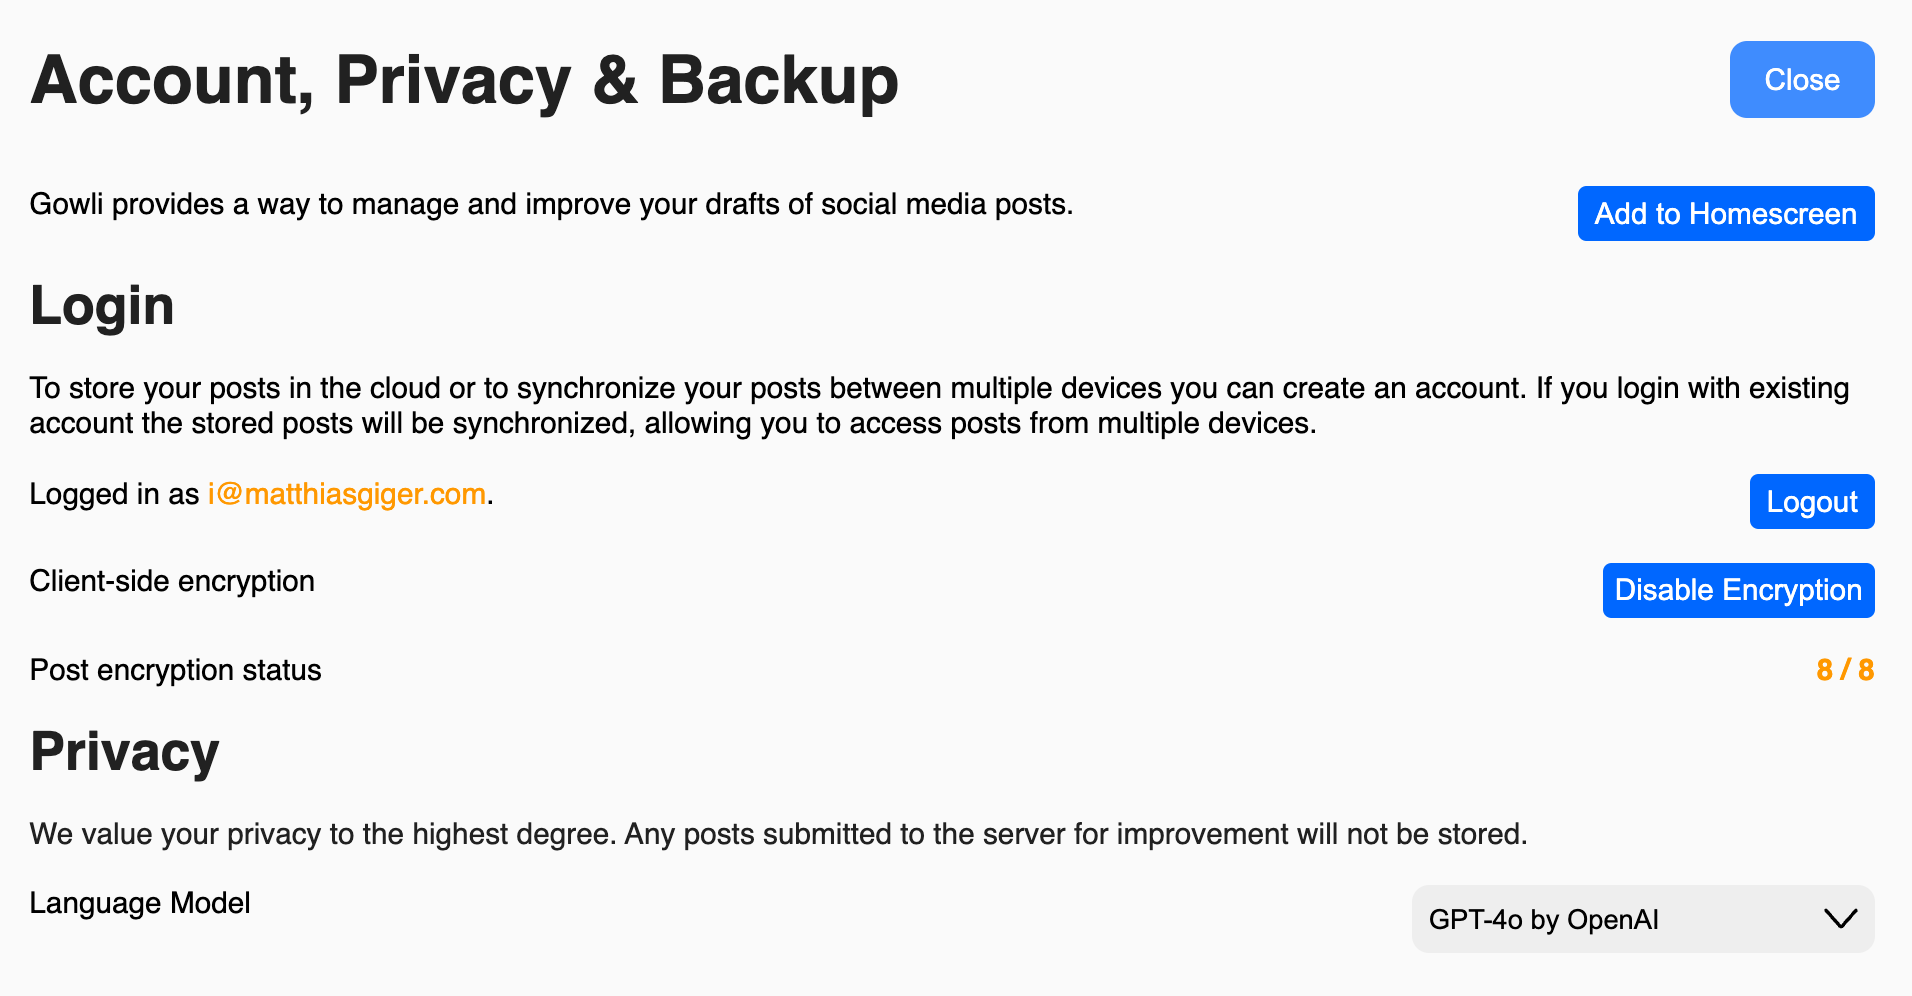
Modal to Login, change privacy settings and create a backup.
While all the functionality I planned for this app is in place, the app and its UI still have some rough edges. Currently, I'm using the app myself and already prefer it in many ways over my previous notes app, plus having to ask ChatGPT each time to improve a post. Synchronization between devices and encryption work smoothly, and I'm really happy with them.
Next Steps
I plan to continue improving the iltio service. While I aim to keep it simple, authentication is a broad and open-ended topic. Upcoming features will include an app that allows you to log in without additional verification and provides an overview of all your active sessions. The app will also let you store encryption keys used for client-side encryption. Additionally, two-step verification is planned, using existing two-factor authentication apps. Finally, a simple “Log in with Google” feature, requiring no configuration or setup on the developer's part, is also in the works.
This post was revised with ChatGPT a Large Language Model.